The MVVMLight framework version 5.3 was released by Laurent Bugnion back in April. This release provides the ObservableRecylerAdapter class for Xamarin.Android. This post presents how to use this class in conjunction with the Android RecyclerView.
This post builds upon my earlier article Xamarin Android List Views and MVVM Light.
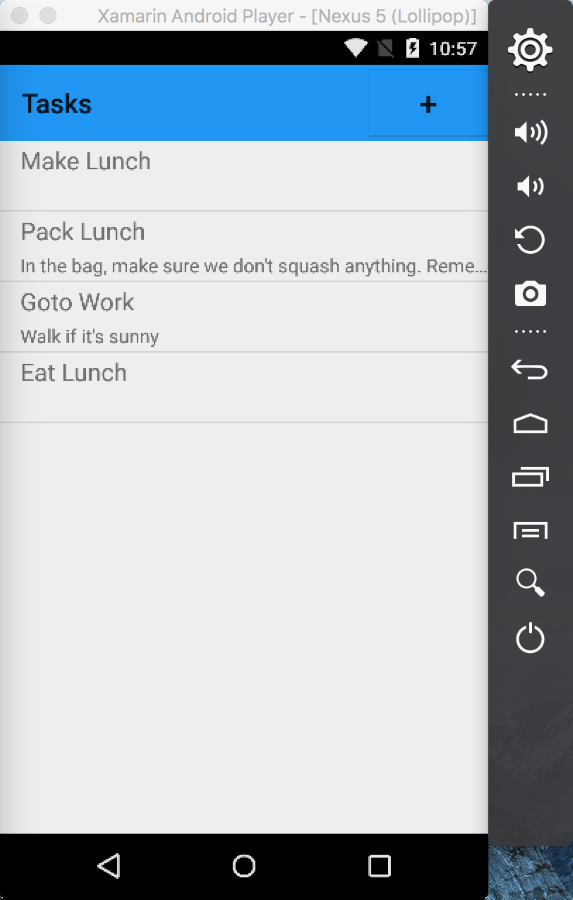
The application will look and work as previously presenting a simple Task List:-
The source code for this post can be found in GitHub.
Overview
The RecyclerView is an Android widget that can efficently display large collections in a list or grid view.
Using the RecyclerView with Xamarin.Android is well covered by the Xamarin documentation for RecyclerView and James Montemagno's recent post RecyclerView: Highly Optimized Collections for Android Apps. Jim Bennett has a good post showing how to use the RecyclerView with MVVM Light prior to the availability of the ObservableRecylerAdapter class at Building a Xamarin Android app - part 4
The RecyclerView is used in conjunction with ViewHolder and Adpater classes which must be written for each usage, and are essentially copy-paste boilerplate classes. With the release of MVVM Light V5.3 Laurent has added the ObservableRecylerAdapter class. When used in conjunction with an extension method there is no longer any need to write the ViewHolder and Adpater classes in the majority of cases. If some special behaviour is required a custom ViewHolder class can be used.
The ObservableRecylerAdapter class is provided in a Nuget package MVVM Light Android Support which is required in additon to the standard MVVM Light libraries only package.
Resources
James Montemagno's post RecyclerView: Highly Optimized Collections for Android Apps.
The Xamarin documentation for RecyclerView.
Jim Bennett's post Building a Xamarin Android app - part 4
The Nuget package Xamarin Android Support Library - V7 RecyclerView.
The MVVM Light Nuget packages MVVM Light libraries only and MVVM Light Android Support.
Laurent's blog post Releasing MVVM Light V5.3 to Nuget.
Laurent's Evolve 2016 Presentation page an In-Depth study of the MVVM Light Databinding System. This page has links to the video's, slides and source code for this Evolve presentation. The
RecyclerViewandObservableRecylerAdapterare discussed at around 34 minutes.The GitHub page for the An In-Depth Study of the MVVM Light Databinding System contains the source code for the examples in the presentation. Examples cover the use of binding, Commanding and Lists for Xamarin.Android and Xamarin.iOS. The
ListsActivityclass provides an example of using theObservableRecylerAdapterclass.
Key Points
The Nuget packages Xamarin Android Support Library - V7 RecyclerView and MVVM Light Android Support need to be added to the Android application project where the
RecyclerViewwill be used. The standard MVVM Light Nuget package MVVM Light libraries only is also required.There are two overloads of the
GetRecyclerAdapterextension methods provided by MVVMLight. These methods create theObservableRecyclerAdapterandViewHolderand wire up the bindings to theObservableCollectionin the view model. I have so far only used the second version which uses theCachingViewHolderclass provided by MVVMLight, the other method is used if you wish to provide a customViewHolderclass. The methods are defined as:-
public static ObservableRecyclerAdapter<TItem,THolder> GetRecyclerAdapter<TItem,
                                                                           THolder>(
                    this IList<TItem> list,
                    Action<THolder, TItem, int> bindViewHolderDelegate,
                    Func<ViewGroup, int, THolder> createViewHolderDelegate,
                    Action<int, View, int, View> clickCallback = null) where
                        THolder : RecyclerView.ViewHolder;

public static ObservableRecyclerAdapter<TItem,CachingViewHolder> GetRecyclerAdapter
              <TItem>(this IList<TItem> list,
                      Action<CachingViewHolder, TItem, int> bindViewHolderDelegate,
                      int cellLayoutId,
                      Action<int, View, int, View> clickCallback = null);
- Using the
ObservableRecyclerAdapteressentially consists of declaring a private member variable of typeObservableRecyclerAdapter
private ObservableRecyclerAdapter<TaskModel, CachingViewHolder> adapter;
- Create an instance of the
ObservableRecyclerAdapterfrom the View Model's ObservableCollection, supplying a delegate to bind the view holder and the ResourceId of the item View used to display each item of the collection:-
// Create the adapter using the default CachingViewHolder
adapter = Vm.TodoTasks.GetRecyclerAdapter(BindViewHolder,
                                          Resource.Layout.TaskTemplate);

TaskRecyclerView.SetAdapter(adapter);
- An example Bind View Holder Delegate method which retrieves the UI Elements and sets the display properties from the Model/View Model's data :-
private void BindViewHolder(CachingViewHolder holder,
                            TaskModel taskModel,
                            int position)
{
    var name = holder.FindCachedViewById<TextView>(Resource.Id.NameTextView);
    name.Text = taskModel.Name;

    var desc = holder.FindCachedViewById<TextView>(Resource.Id.NotesTextView);
    desc.Text = taskModel.Notes;
}
In BindViewHolder an MVVM Light data binding can be used but care must be taken to first delete any existing binding as this will be re-used. Add some more stuff about this, mention that there is also a SelectedItem property on the adpater which can also be data bound to, see around 40 minutes in the presentation. The source code for the presenttion An In-Depth Study of the MVVM Light Databinding System contains example of this.
It is important to delete any data binding set in the
BindViewHoldermethod as the View Holder is reused -holder.DeleteBinding(name);For those in a hurry an example listing is shown below:-
Full class listing:-
using Android.App;
using Android.Widget;
using Android.OS;

using ObservableTables.ViewModel;

using GalaSoft.MvvmLight.Helpers;
using Android.Support.V7.Widget;

namespace ObservableTables.Droid
{
    [Activity (Label = "Tasks",
               Theme = "@style/AppTheme",
               MainLauncher = true,
               Icon = "@mipmap/icon")]
    public class MainActivity : Activity
    {
        private RecyclerView taskRecyclerView;
        private ObservableRecyclerAdapter<TaskModel, CachingViewHolder> adapter;

        public RecyclerView TaskRecyclerView
        {
            get
            {
                return taskRecyclerView ??
                  (taskRecyclerView = FindViewById<RecyclerView>(
                        Resource.Id.tasksRecyclerView));
            }
        }

        public TaskListViewModel Vm
        {
            get
            {
                return App.Locator.TaskList;
            }
        }

        protected override void OnCreate (Bundle savedInstanceState)
        {
            base.OnCreate (savedInstanceState);

            // Set our view from the "main" layout resource
            SetContentView (Resource.Layout.Main);

            Vm.Initialize ();

            TaskRecyclerView.SetLayoutManager(new LinearLayoutManager(this,
                                              LinearLayoutManager.Vertical, false));

            // Create the adapter using the default CachingViewHolder
            adapter = Vm.TodoTasks.GetRecyclerAdapter(BindViewHolder,
                                                      Resource.Layout.TaskTemplate);

            TaskRecyclerView.SetAdapter(adapter);
        }

        private void BindViewHolder(CachingViewHolder holder,
                                    TaskModel taskModel,
                                    int position)
        {
            var name = holder.FindCachedViewById<TextView>(Resource.Id.NameTextView);
            name.Text = taskModel.Name;

            var desc = holder.FindCachedViewById<TextView>(Resource.Id.NotesTextView);
            desc.Text = taskModel.Notes;
        }
    }
}
The corresponding view needs to have a RecyclerView such as this:-
<android.support.v7.widget.RecyclerView
                android:id="@+id/tasksRecyclerView"
                android:layout_width="match_parent"
                android:layout_height="wrap_content" />
Refactor from ListView to RecyclerView
The following sections demonstrate how to refactor from using a ListView to using a RecyclerView with the MVVM Light ObservableRecyclerAdapter. I will be using the source code from the article Xamarin Android List Views and MVVM Light and walking through the steps required. These steps will be largely the same as for starting from scratch but save me from describing again the setting up of a new project and adding MVVM Light support and View Models etc. My earlier posts describe how to do this.
Add the Nuget packages
To start with we need to add the Nuget packages for the Xamarin Android Support V7 Recycler View and MVVM Light Android support.
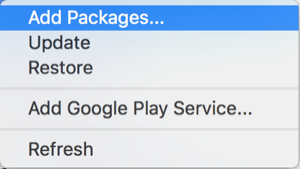
In the Solution Explorer right click Packages folder of the ObservableTables.Droid project and choose the Add Packages...* menu option.
The Add Packages dialog will be displayed. In the the Add Packages dialog type Xamarin Android Support Library in the Search. The Nuget package Xamarin Android Support Library - V7 RecyclerView should be listed.
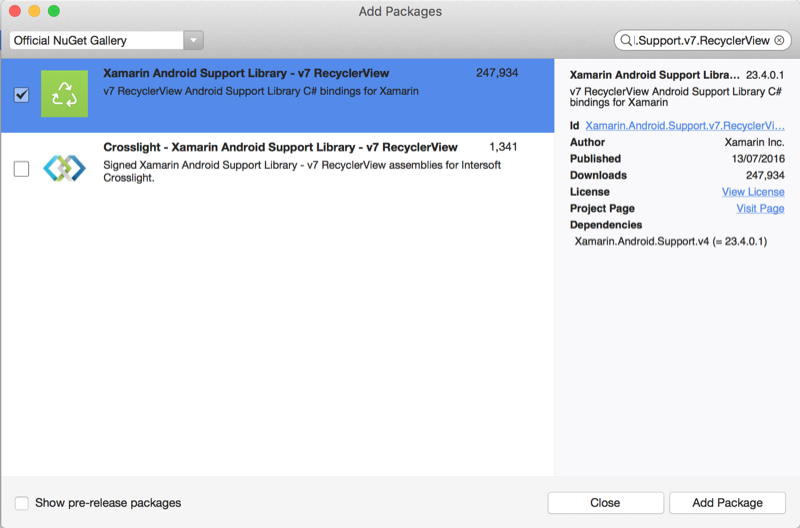
Check the option and click the Add Package button. The Licence dialog will be displayed:-
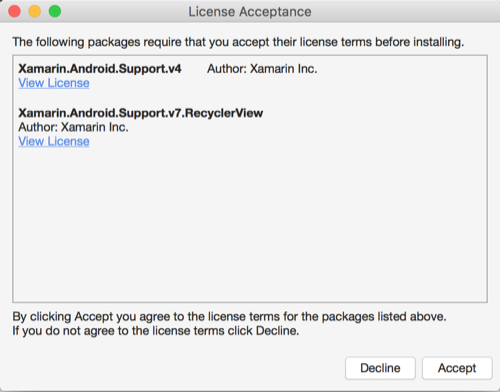
Click the Accept button and the package will be added to the project.
Once again right click the Packages folder of the ObservableTables.Droid project and choose the Add Packages...* menu option. In the the Add Packages dialog type MVVMLightAndroid Support in the Search. The Nuget package MVVM Light Android Support Library should be listed.

Check the option and click the Add Package button. The Licence dialog will be displayed:-
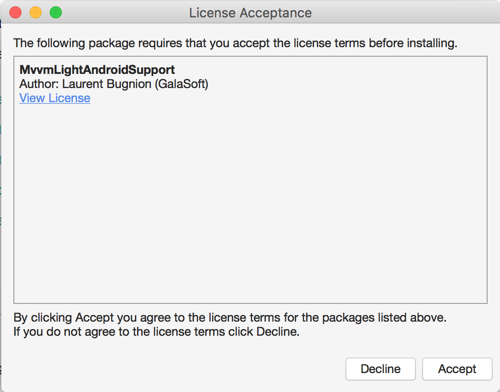
Click the Accept button and the package will be added to the project.
Modify the View to use the RecylerView
Open the Main.axml in the Resources\layout folder and switch to the Source tab. The existing layout is defined with a ListView:-
<?xml version="1.0" encoding="utf-8"?>
<LinearLayout xmlns:android="http://schemas.android.com/apk/res/android"
    android:orientation="vertical"
    android:layout_width="match_parent"
    android:layout_height="match_parent"
    android:minWidth="25px"
    android:minHeight="25px">
    <Toolbar
        android:minHeight="?android:attr/actionBarSize"
        android:background="?android:attr/colorPrimary"
        android:minWidth="25px"
        android:layout_width="match_parent"
        android:layout_height="wrap_content"
        android:id="@+id/tasksToolbar"
        android:title="Tasks"
        android:gravity="center_horizontal">
        <Button
            android:text="+"
            android:layout_alignParentRight="true"
            android:layout_width="wrap_content"
            android:layout_height="wrap_content"
            android:layout_marginLeft="2dp"
            android:id="@+id/addTaskButton"
            android:background="?android:attr/colorPrimary"
            android:textSize="24dp"
            android:layout_gravity="right" />
    </Toolbar>
    <ListView
        android:minWidth="25px"
        android:minHeight="25px"
        android:layout_width="match_parent"
        android:layout_height="match_parent"
        android:id="@+id/tasksListView" />
</LinearLayout>
Now we need to edit this to replace the list view with the RecyclerView and save the file:-
<android.support.v7.widget.RecyclerView
                android:id="@+id/tasksRecyclerView"
                android:layout_width="match_parent"
                android:layout_height="wrap_content" />
The file should look like this:-
<?xml version="1.0" encoding="utf-8"?>
<LinearLayout xmlns:android="http://schemas.android.com/apk/res/android"
    android:orientation="vertical"
    android:layout_width="match_parent"
    android:layout_height="match_parent"
    android:minWidth="25px"
    android:minHeight="25px">
    <Toolbar
        android:minHeight="?android:attr/actionBarSize"
        android:background="?android:attr/colorPrimary"
        android:minWidth="25px"
        android:layout_width="match_parent"
        android:layout_height="wrap_content"
        android:id="@+id/tasksToolbar"
        android:title="Tasks"
        android:gravity="center_horizontal">
        <Button
            android:text="+"
            android:layout_alignParentRight="true"
            android:layout_width="wrap_content"
            android:layout_height="wrap_content"
            android:layout_marginLeft="2dp"
            android:id="@+id/addTaskButton"
            android:background="?android:attr/colorPrimary"
            android:textSize="24dp"
            android:layout_gravity="right" />
    </Toolbar>
    <android.support.v7.widget.RecyclerView
                android:id="@+id/tasksRecyclerView"
                android:layout_width="match_parent"
                android:layout_height="match_parent" />
</LinearLayout>
Modify the Activity to use the RecyclerView and ObservableRecyclerAdapter
Open the MainActivity.cs file. The current listing using the ListView is:-
using Android.App;
using Android.Widget;
using Android.OS;
using Android.Views;

using ObservableTables.ViewModel;

using GalaSoft.MvvmLight.Helpers;

namespace ObservableTables.Droid
{
    [Activity (Label = "Tasks",
               Theme = "@style/AppTheme",
               MainLauncher = true,
               Icon = "@mipmap/icon")]
    public class MainActivity : Activity
    {
        private ListView taskList;

        private Button addTaskButton;

        public ListView TaskList
        {
            get
            {
                return taskList ?? (
                       taskList = FindViewById<ListView>(Resource.Id.tasksListView));
            }
        }

        public Button AddTaskButton
        {
            get
            {
                return addTaskButton ?? (
                       addTaskButton = FindViewById<Button>(Resource.Id.addTaskButton));
            }
        }

        public TaskListViewModel Vm
        {
            get
            {
                return App.Locator.TaskList;
            }
        }

        protected override void OnCreate (Bundle savedInstanceState)
        {
            base.OnCreate (savedInstanceState);

            // Set our view from the "main" layout resource
            SetContentView (Resource.Layout.Main);

            var toolbar = FindViewById<Toolbar> (Resource.Id.tasksToolbar);
            //Toolbar will now take on default Action Bar characteristics
            SetActionBar (toolbar);

            Vm.Initialize ();
            TaskList.Adapter = Vm.TodoTasks.GetAdapter(GetTaskAdapter);

            //ensure that the Event will be present
            AddTaskButton.Click += (sender, e) => {};

            // Actuate the AddTaskCommand on the VM.
            AddTaskButton.SetCommand("Click",
                                     Vm.AddTaskCommand);
        }

        private View GetTaskAdapter(int position,
                                    TaskModel taskModel,
                                    View convertView)
        {
            // Not reusing views here
            convertView = LayoutInflater.Inflate(Resource.Layout.TaskTemplate, null);

            var title = convertView.FindViewById<TextView>(Resource.Id.NameTextView);
            title.Text = taskModel.Name;

            var desc = convertView.FindViewById<TextView>(Resource.Id.NotesTextView);
            desc.Text = taskModel.Notes;

            return convertView;
        }
    }
}
We need to modify this to:-
- Add a using statement for
Android.Support.V7.Widget - Provide a property to reference the
RecyclerViewrather than theListView - Create a private member variable of type
ObservableRecyclerAdapter - Set the LayoutManager on the
RecyclerView. - Use the extension method
GetRecyclerAdapteron the Vm.TodoTasksObservableCollectionto create the adapter - Call the
SetAdaptermethod on theRecyclerViewto set this adpater - Provide a
BindViewHoldermethod
The modified class listing is shown below:-
using Android.App;
using Android.Widget;
using Android.OS;

using ObservableTables.ViewModel;

using GalaSoft.MvvmLight.Helpers;
using Android.Support.V7.Widget;

namespace ObservableTables.Droid
{
    [Activity(Label = "Tasks",
              Theme = "@style/AppTheme",
              MainLauncher = true,
              Icon = "@mipmap/icon")]
    public class MainActivity : Activity
    {
        private RecyclerView taskRecyclerView;
        private ObservableRecyclerAdapter<TaskModel, CachingViewHolder> adapter;

        private Button addTaskButton;

        public RecyclerView TaskRecyclerView
        {
            get
            {
                return taskRecyclerView ??
                    (taskRecyclerView = FindViewById<RecyclerView>(
                                            Resource.Id.tasksRecyclerView));
            }
        }

        public Button AddTaskButton
        {
            get
            {
                return addTaskButton ??
                    (addTaskButton = FindViewById<Button>(
                                         Resource.Id.addTaskButton));
            }
        }

        public TaskListViewModel Vm
        {
            get
            {
                return App.Locator.TaskList;
            }
        }

        protected override void OnCreate (Bundle savedInstanceState)
        {
            base.OnCreate (savedInstanceState);

            // Set our view from the "main" layout resource
            SetContentView (Resource.Layout.Main);

            var toolbar = FindViewById<Toolbar> (Resource.Id.tasksToolbar);
            //Toolbar will now take on default Action Bar characteristics
            SetActionBar (toolbar);

            Vm.Initialize ();

            TaskRecyclerView.SetLayoutManager(new LinearLayoutManager(this,
                                              LinearLayoutManager.Vertical, false));

            // Create the adapter using the default CachingViewHolder
            adapter = Vm.TodoTasks.GetRecyclerAdapter(BindViewHolder,
                                                      Resource.Layout.TaskTemplate);

            TaskRecyclerView.SetAdapter(adapter);

            //ensure that the Event will be present
            AddTaskButton.Click += (sender, e) => {};

            // Actuate the AddTaskCommand on the VM.
            AddTaskButton.SetCommand("Click", Vm.AddTaskCommand);
        }

        private void BindViewHolder(CachingViewHolder holder, TaskModel taskModel, int position)
        {
            var name = holder.FindCachedViewById<TextView>(Resource.Id.NameTextView);
            name.Text = taskModel.Name;

            var desc = holder.FindCachedViewById<TextView>(Resource.Id.NotesTextView);
            desc.Text = taskModel.Notes;
        }
    }
}
A further change was required to the TaskTemplate layout to change the layout_height property of the LinearLayout from match_parent to wrap_content.
When the app is run it should look pretty much the same as it previously did when using a ListView. The dividing lines automatically provided by the ListView are missing, so some styling work would be worthwhile:-

Using Data Bindings in the BindViewHolder method
The example I have provided can be extended to use bindings if the data source for the information displayed in the RecyclerView will change. If the data source doesn't change then it's better to simply set the values and not pay the price for data binding.
It is important to delete any data binding set in the BindViewHolder method as the View Holder is reused - holder.DeleteBinding(name);
The exmple below shows the original code commented out and the data bindings added:-
private void BindViewHolder(CachingViewHolder holder,
                            TaskModel taskModel,
                            int position)
{
    // if the data source doesn't change use the simpler form below
    //var name = holder.FindCachedViewById<TextView>(Resource.Id.NameTextView);
    //name.Text = taskModel.Name;

    //var desc = holder.FindCachedViewById<TextView>(Resource.Id.NotesTextView);
    //desc.Text = taskModel.Notes;

    var name = holder.FindCachedViewById<TextView>(Resource.Id.NameTextView);
    holder.DeleteBinding(name);

    var nameBinding = new Binding<string, string>(taskModel,
                                                  () => taskModel.Name,
                                                  name,
                                                  () => name.Text,
                                                  BindingMode.OneWay);

    holder.SaveBinding(name, nameBinding);

    var desc = holder.FindCachedViewById<TextView>(Resource.Id.NotesTextView);
    holder.DeleteBinding(desc);

    var descBinding = new Binding<string, string>(taskModel,
                                                  () => taskModel.Notes,
                                                  desc,
                                                  () => desc.Text,
                                                  BindingMode.OneWay);

    holder.SaveBinding(desc, descBinding);
}
In conclusion we can see that the use of the ObservableRecyclerAdapter saves us time writing boiler-plate classes for the Adapter and ViewHolder in the majority of cases.