This post shows how to setup Visual Studio Team Services to build a Xamarin iOS application using a MacinCloud VSTS Build Agent.
It builds upon the VSTS Team Project created in the getting started post.
I updated the Key Points section on the 2nd June 2016 to add advice when using Agent Pools other than the Default and clarification of the VSTS local Build Agent links.
Resources
Microsoft documentation Specify your build steps, Build your Xamarin appand Build Xamarin.iOS
Rasmus Christensen’s post CI With VSTS And Xamarin explains how to use VSTS for Continuous Integration when using your own on-premise Mac. Note this uses the older stable version of the build agent.
Chris Patterson’s post MacinCloud Visual Studio Team Services Build and Improvements to iOS Build Support.
MacinCloud’s Getting Started with the MacinCloud VSTS Build Agent Plan
Lori Lalonde’s post Continuous Integration with Xamarin.iOS, Visual Studio Team Services, and MacinCloud: Part 1. Please note that the steps 7, 7a, 7b and 7c are no longer required to setup the Xamarin Licence on the MacinCloud Build agent, I followed these steps and MacinCloud support got back to me within around 20 mins to tell me that these steps are no longer required. I was impressed with the speed with which MacinCloud helped me out - good first impressions.
Brandons H’s post eXtreme Agile: Continuous Mobile Deployment with VSTS. In this post he demonstrates how to protect the Xamarin account password in the build steps using a build variable. Note that the post is a little out of date and there is now a Build Xamarin.Android Project build step.
The Microsoft documentation Use Variables also details the use of Secret Variables to protect passwords etc required in Build Step Definitions.
Xamarin Lightning Lecture Setting Up an iOS Device for Deployment by Mark Smith
Xamarin documentation for Ad-Hoc Distribution covers the process of generating a Ad-Hoc Distribution profile.
How do I make a .p12 file and stackoverflow: How to create P12 certificate for iOS distribution
Key Points
The CI Build Process requires a Xamarin Licence.
Apple code signing certificates and provisioning profiles are required.
To build an iOS app requires Apple hardware, in this post I use MacinCloud’s Visual Studio Team Services Build Agent Plan.
If you wish to build an iOS app using your own hardware rather than MacinCloud then these links run through the steps:- VSTS Agent, Final Chapter: Continuous Mobile Deployment with VSTS and CI With VSTS And Xamarin. Note these uses the older stable version of the build agent. I have written a post Setup a Cross Platform Build Agent on OSX which covers setting up the new (Preview status) Cross Platform Build Agent.
If you want to use an Agent Pool other than the Default be sure to set this up in VSTS before configuring the MacinCloud build Agent. The MacinCloud Getting Started with the MacinCloud VSTS Build Agent Plan has the following instructions regarding this:-
Pool Name: This must match your VSTS pool name. If you have not created a pool in VSTS, Please leave the "default" setting alone. If you did create a pool, or wish to join the agent to an existing pool, please make sure you completed Step #3 above. Notice that the "pool name" cannot be set to "hosted", as the "hosted" pool is reserved for Microsoft Hosted Agents.
You can set multiple MacinCloud Build Agents to use the same Agent Pool and as such can then run multiple iOS project builds at the same time.
You must be using the Stable update channel for these Hosted CI builds to work. I was initially using Xamarin Studio 6.1 from the Alpha Channel and the Android builds were failing so I reverted back to the Stable channel and they worked fine. This is to be expected, but worth noting none the less.
Create Xamarin.iOS Continuous Integration Build
The iOS build requires Apple hardware, if using your own Mac then refer to these links for setup instructions, basically installing a Build Agent on your Mac:-
The next steps detail how to setup the MacinCloud Visual Studio Team Services Build Agent Plan. Note that the steps found in some other posts on the internet are now out of date and there is no requirement to contact either MacinCloud or Xamarin support in order to setup the Xamarin licence on the MacinCloud Build Agent.
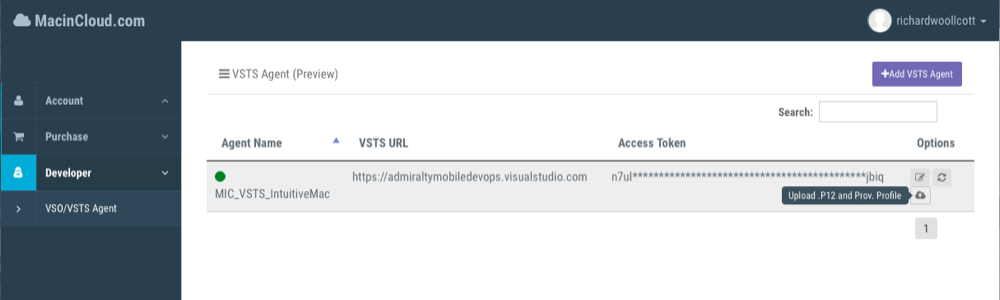
One thing you will need is a credit/debit card or PayPal, the Build Agent is available for a 48 hour trial for $0.99, $29 per month thereafter. After signing up to the VSTS Build Agent Plan create a MacinCloud account and login. Click on the ‘VSO/VSTS Agent’ entry under the Developer section. The available build agents will be displayed, the screenshot below shows one already configured:-
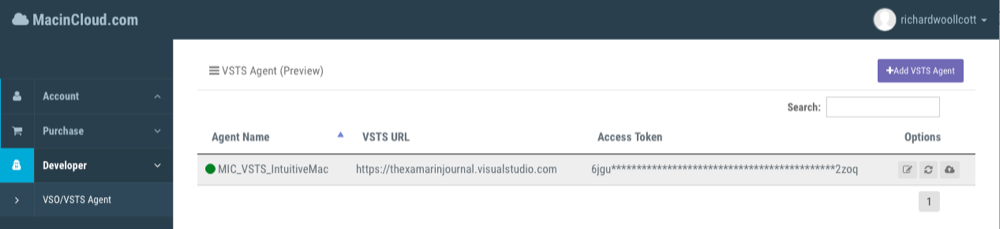
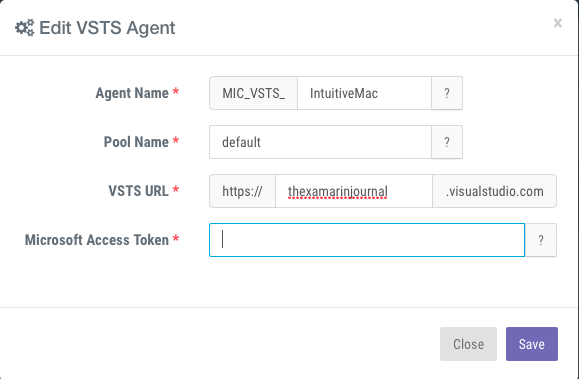
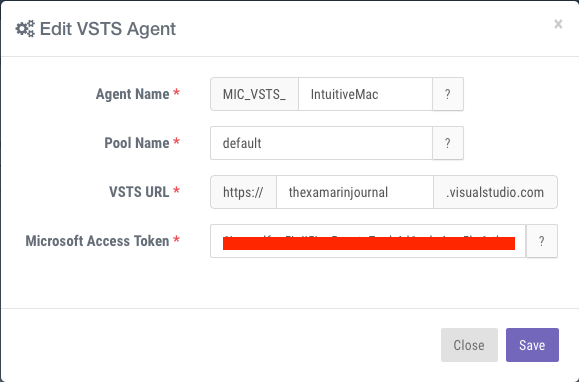
Click on the ‘Edit Agent’ button to the left of the ‘Access Token’ column. The Edit VSTS Agent dialog is shown, provide an Agent Name and enter the VSTS site Url in this example ‘thexamarinjournal’. :-
Now we need to generate a Microsoft Access Token and add the user to the Agent Pool roles. This is done back in VSTS, I found step 3 of the post MacinCloud Visual Studio Team Services Build and Improvements to iOS Build Support contained instructions for doing this.
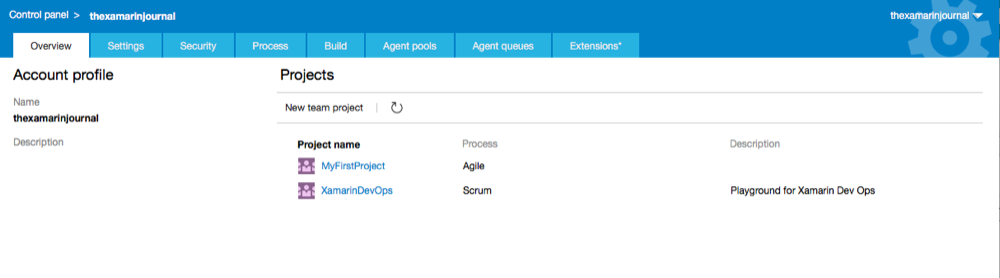
In VSTS click on settings cog in the top right and the Control Panel will be displayed:-
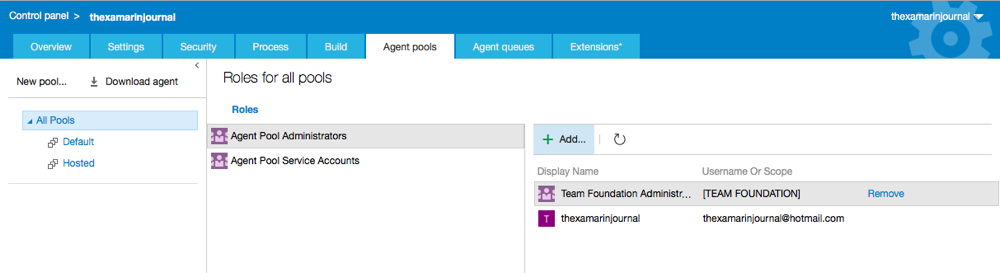
Select the ‘Agent pools’ tab and then select the ‘All Pools’ entry:-
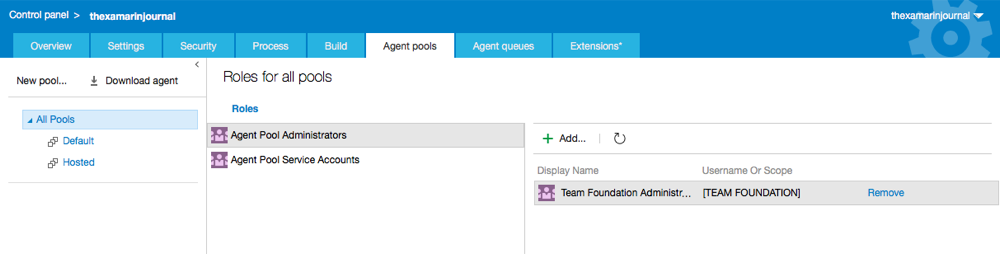
Now add your user to both the ‘Agent Pool Administrators’ and ‘Agent Pool Service Accounts’ roles. Select the ‘Agent Pool Administrators’ entry and click the ‘Add’ button. The ‘Add users and groups’ dialog is displayed:-
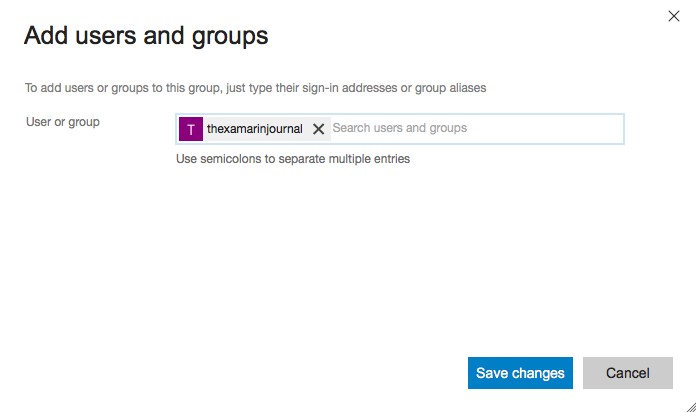
Enter the user in this case ‘thexamarinjournal’ and then click the ‘Save changes’ button:-
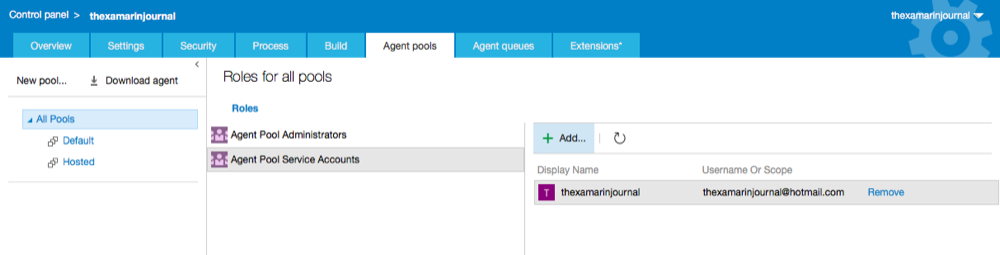
Select the ‘Agent Pool Service Accounts’ entry and repeat the previous steps to add the user.
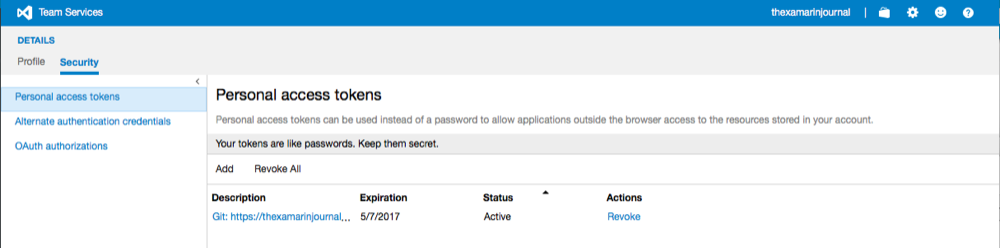
Now we can create the Personal Access Token. Go back to the previous tab and click on the user name ‘thexamarinjournal’ in the top right and select the ‘My Profile’ entry:-

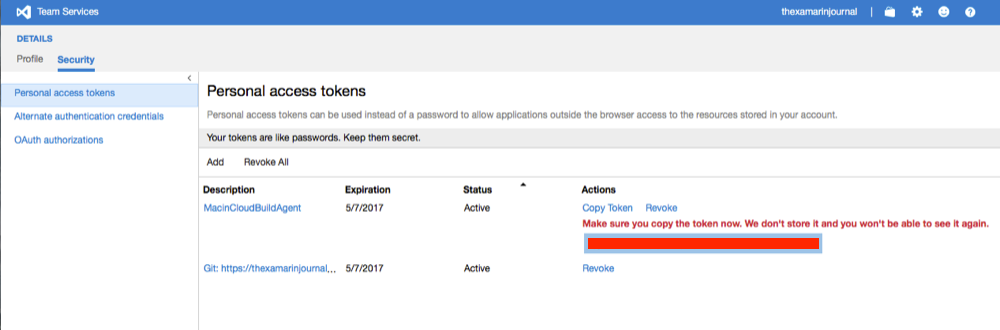
Click on the ‘Security’ tab and the ‘Personal access tokens’ list will be displayed. This should be empty, in my case using the Git Credential Manager has already created a personal access token, I won’t cover that in this post:-
Click the ‘Add’ button and the ‘Create a personal access token’ page is displayed:-
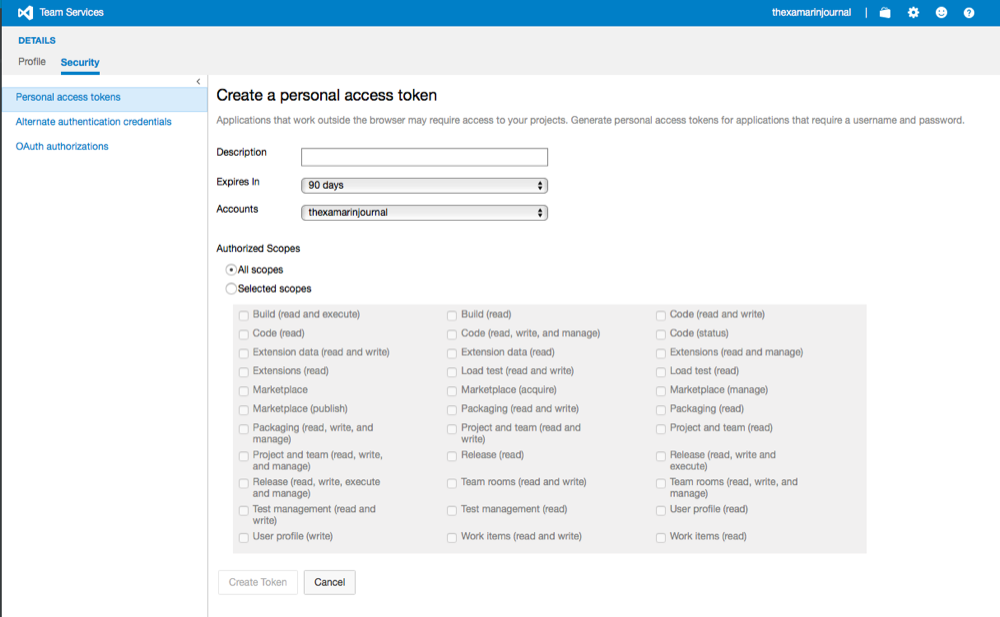
Next enter a description and set the ‘Expires in to the ‘1 year’ option. The ‘All scopes’ option should be checked.
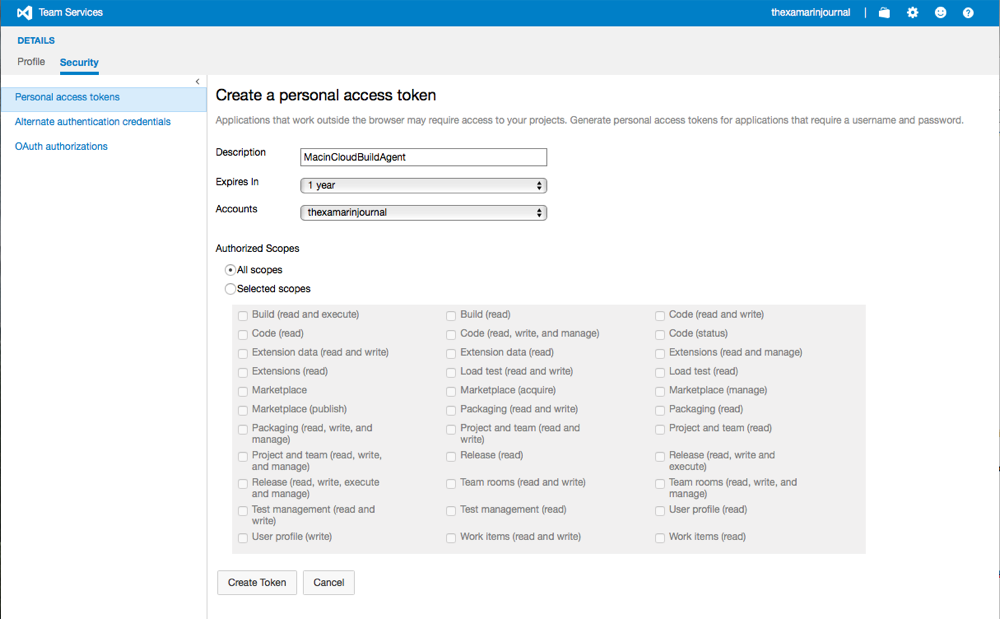
Click the ‘Create Token’ button. The token will now be displayed with a message warning that it’s only available this one time so copy it.
Return to the MacInCloud ‘Edit VSTS Agent’ and paste the token. Note that in this instance with have left the Pool Name as ‘default’ but we might be better to rename it to something more obviously related to the iOS build:-
Click the ‘Save button:-

Certificates
The iOS Distribution and Development certificates can be downloaded from the Apple Developer Portal. Sign in.
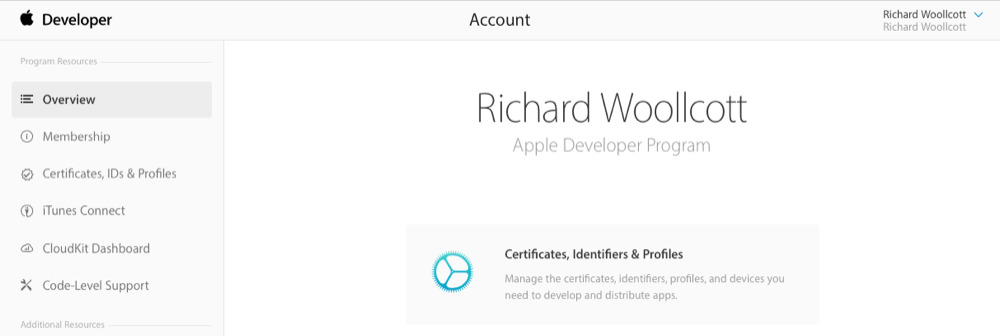
Click on the ‘Certificates, Identifiers & Profiles’ link.
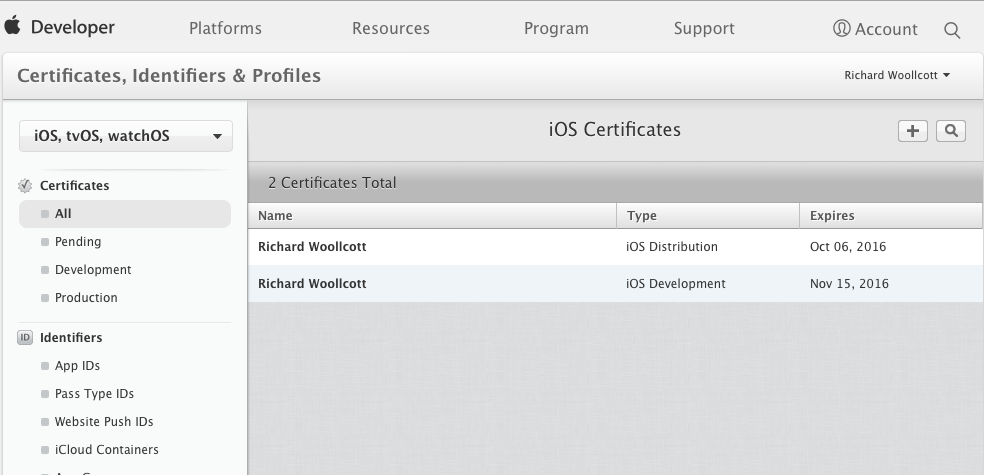
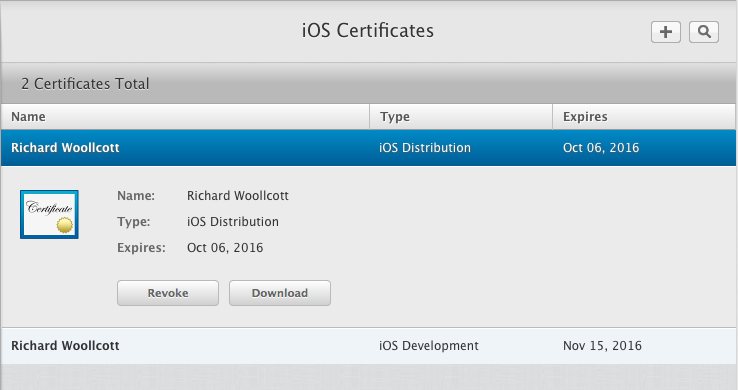
Click on the iOS Distribution entry and then click on the ‘Download’ button.
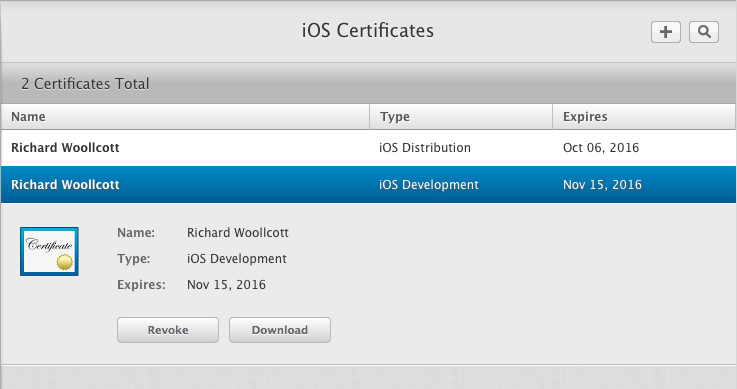
Next click on the iOS Development entry and then click on the ‘Download’ button.
Once downloaded double click on the iOS development certificate file (named ios_development.cer for example).
An ‘Add Certificates’ dialog will be displayed.
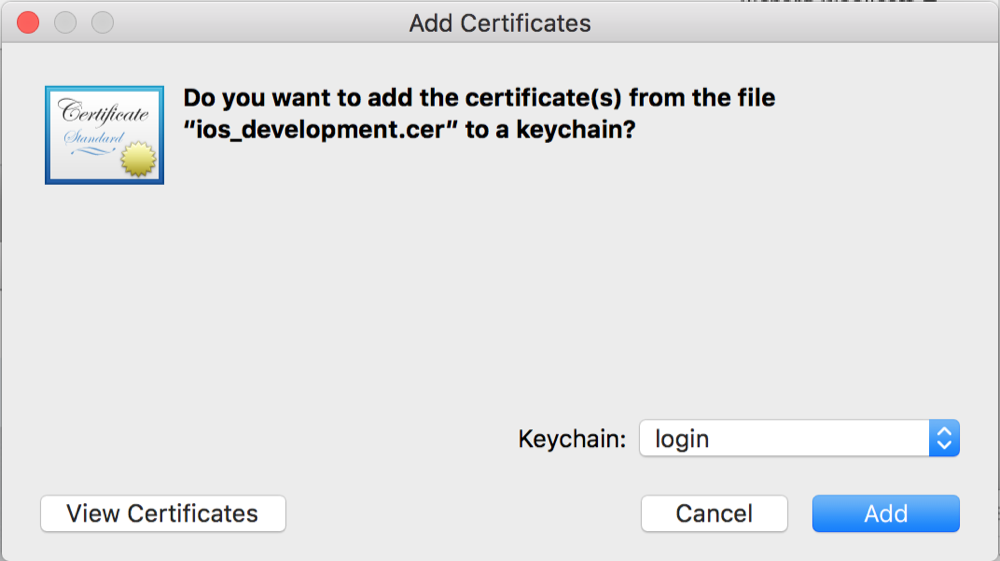
Click the ‘Add’ button to add the certificate into the KeyChain.
Next copy the Provisioning Profile file we just downloaded to the ‘HelloDevOps’ directory alongside the solution file.
Now we need to create a .P12 file from the iOS Development Certificate. To do this we can use KeyChain Access so start this from Spotlight or similar and click on the ‘My Certificates’ entry:-
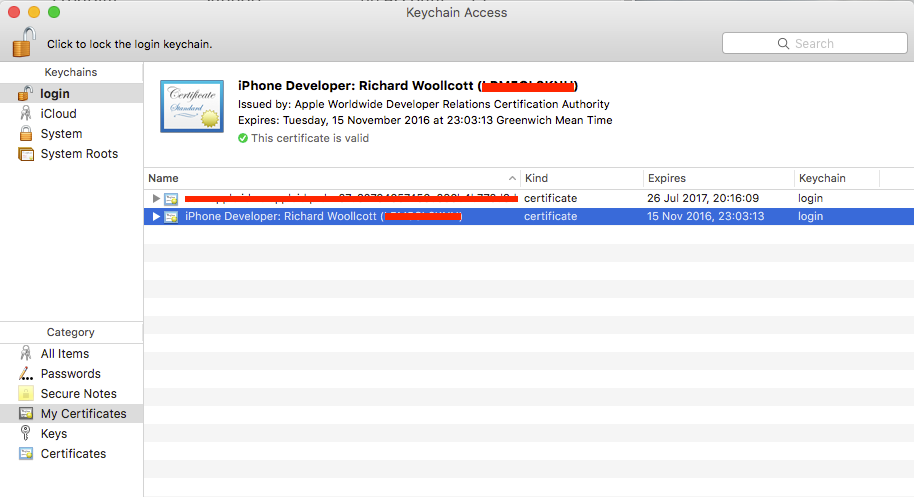
Next expand the iPhone Developer entry so we can see the private key also. Use a Shift select to select both items and right click:-
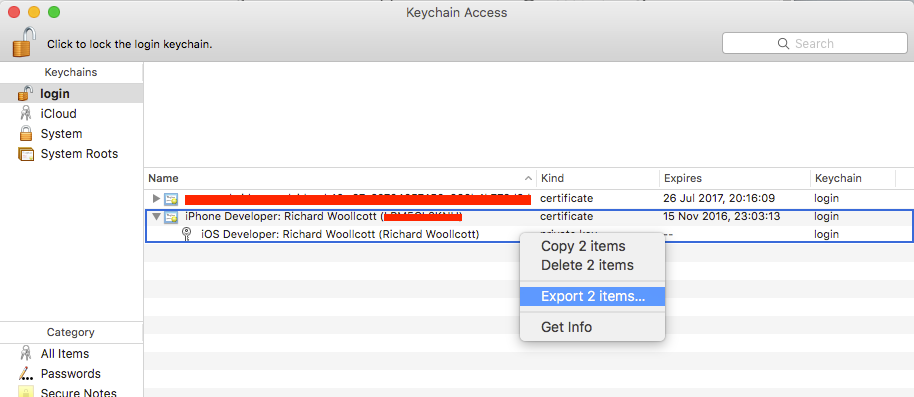
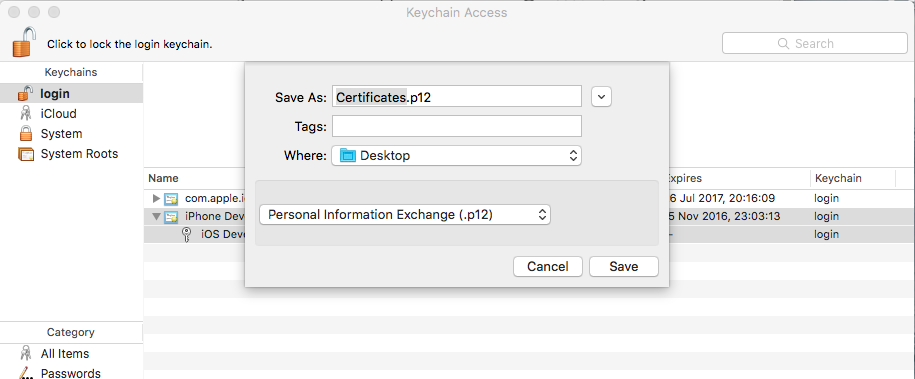
Now select the ‘Export 2 items…’ option and save the .P12 file to the ‘HelloDevOps’ directory alongside the solution file..
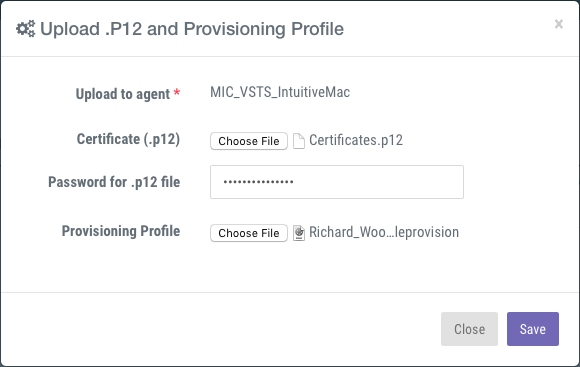
Now we can go back to the MacinCloud portal and click on the button with the cloud icon (tooltip ‘Upload .P12 and Prov. Profile’):-
Now select the .P12 certificate file and the Provisioning Profile file enter the .P12 file password and click the ‘Save’ button.
The MacinCloud VSTS Build Agent is now setup.
Setup For Building the iOS Solution
The VSTS Xamarin.iOS build step builds an entire solution. In this instance the MacinCloud VSTS Build Agent won't be installed with Xamarin.Android so we need to make sure that we only try to build iOS/Shared Projects/PCL projects.
One option is to create new project configurations, this is detailed in the section 'Configure the solution for iOS Release' in Build your Xamarin app.
Another option is to create a new solution which will only contain the iOS projects and this is detailed below.
Open Xamarin Studio and create a new Blank Solution:-
![]()
Set the configuration to be the XamarinDevOps directory:-
![]()
Now close the solution in Xamarin Studio and move the solution file to sit up a directory alongside the existing solution. Delete the newly created ‘HelloDevOps.iOs’ directory.
Open the HelloDevOps.iOs solution and add the iOS and Shared Project. At the Terminal change to the ‘HelloDevOps’ directory and execute the command
git add HelloDevOps.iOS.sln
Next add the certificate files to the repository so that we can reference them in the iOS Build Definition in VSTS using the commands
git add Certificates.p12
git add Richard_Woollcott-3.mobileprovision
Now use the git command line or Xamarin Studio to commit the changes and push them back to the VSTS Remote.
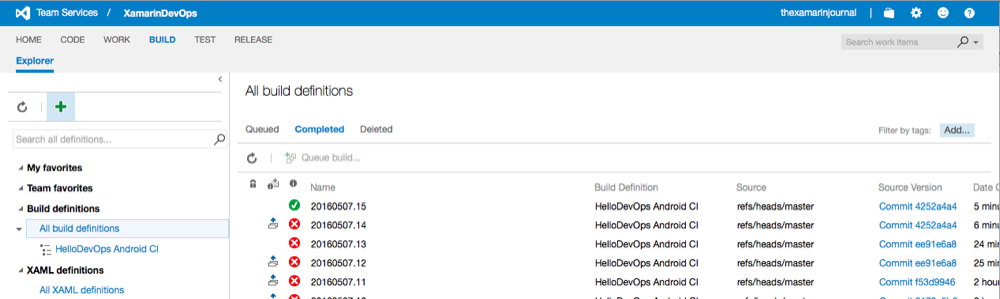
In VSTS navigate to the Build page and click the ‘+’ button to create a new build definition for iOS:-
The ‘Create new build definition’ dialog is displayed. Double click the ‘Xamarin.iOS’ entry, and the settings page of the dialog is shown:-
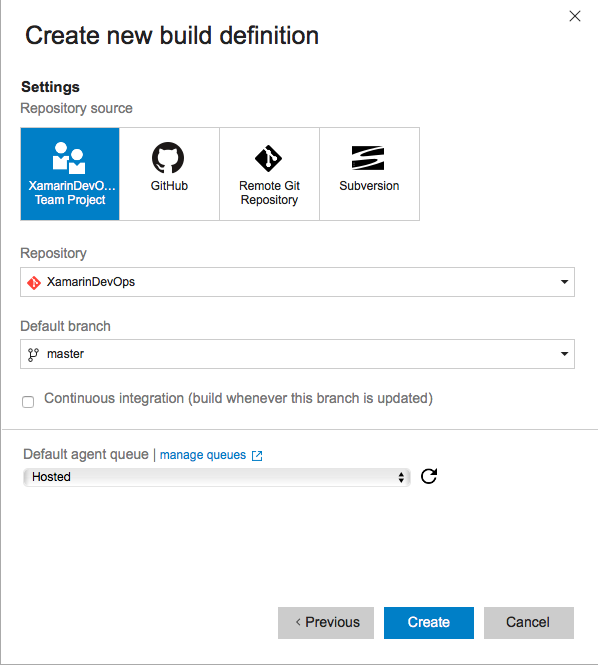
Next check the ‘continuous integration’ option and change the ‘Default agent queue’ selection from ‘Hosted’ to ‘Default’.
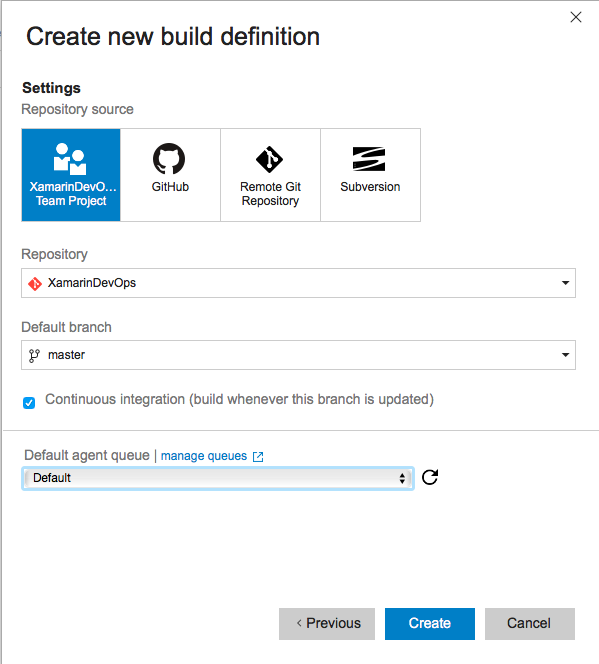
Click the ‘Create’ button.

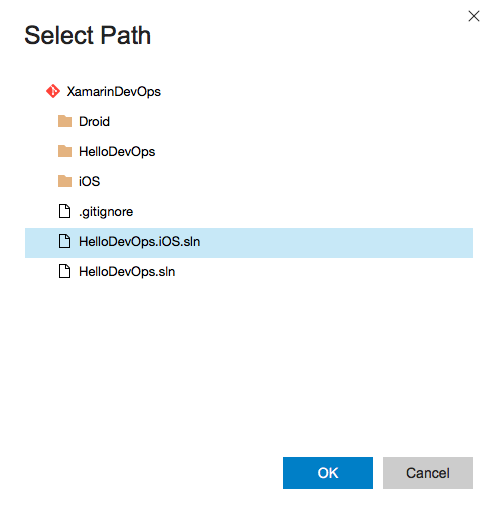
Select the 'Xamarin.iOS build step:-
![]()
To the right of the Solution field use the '...' button to browse to the iOS specific solution.
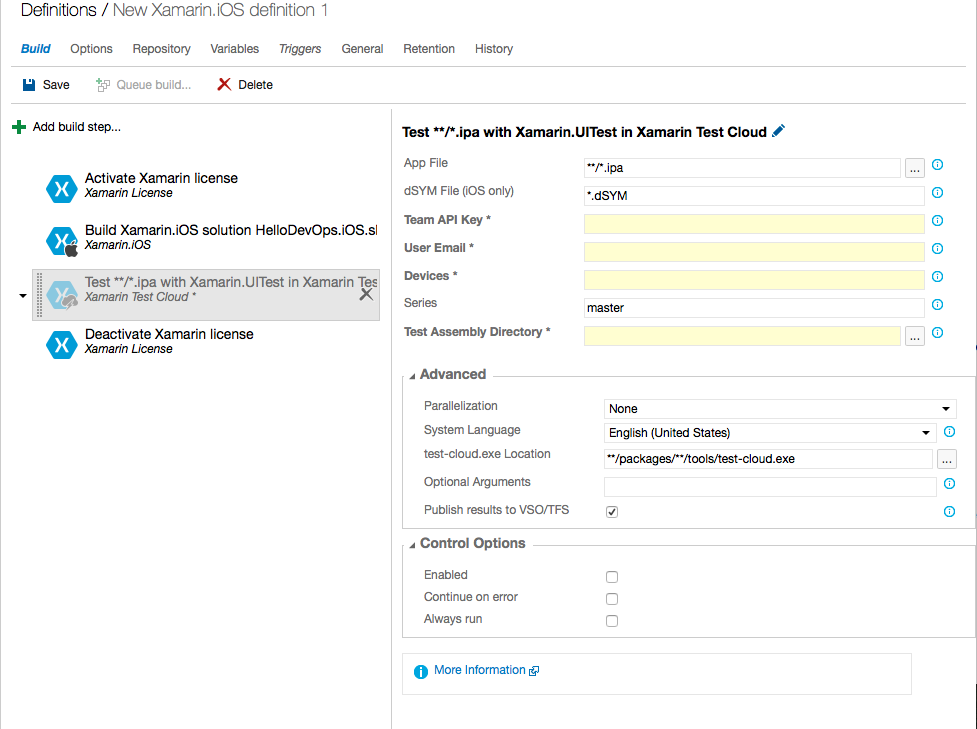
This post is focussing on getting the iOS app built, so we will not need the 'Xamarin Test Cloud' build step. We could delete it or just disable it later if we intend to setup UI tests later. Disable the ‘Xamarin Test Cloud’ build step by unchecking the ‘Enabled’ option in the ‘Control Options’ panel.
Click the 'OK button.
Next delete the build steps ‘Activate Xamarin license’ and ‘Deactivate Xamarin license’
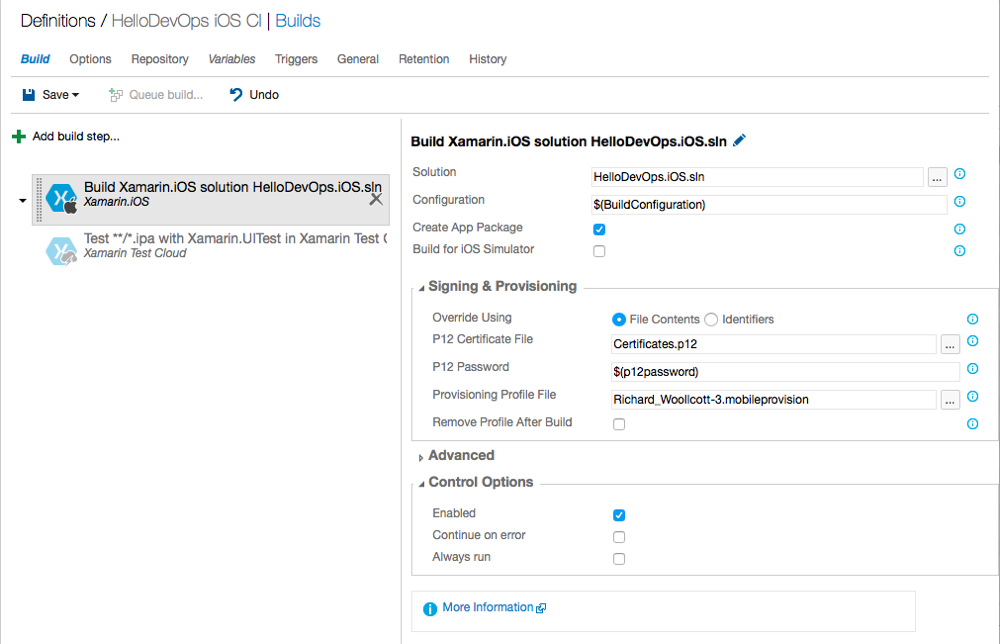
Now select the build step ‘Build Xamarin.iOS solution HelloDevOps.iOS.sln’
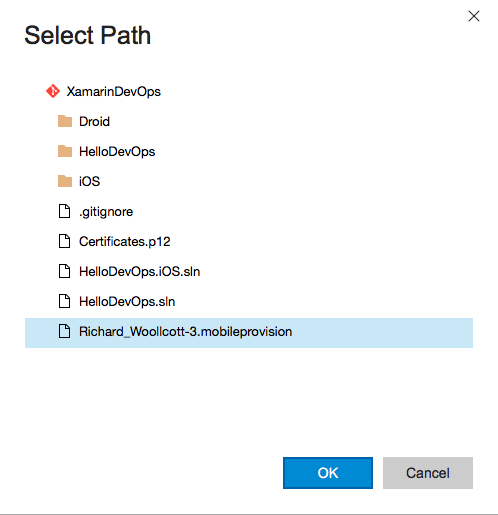
Press the ‘…’ browse button to the right of the ‘P12 Certificate File’ textbox. The ’Select Path’ dialog is displayed:-
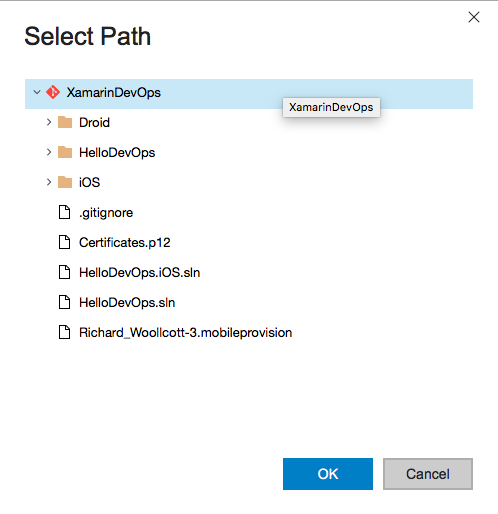
Select the ‘Certificates.P12’ file and click the ‘OK’ button.
Repeat this for the Provisioning Profile file:-
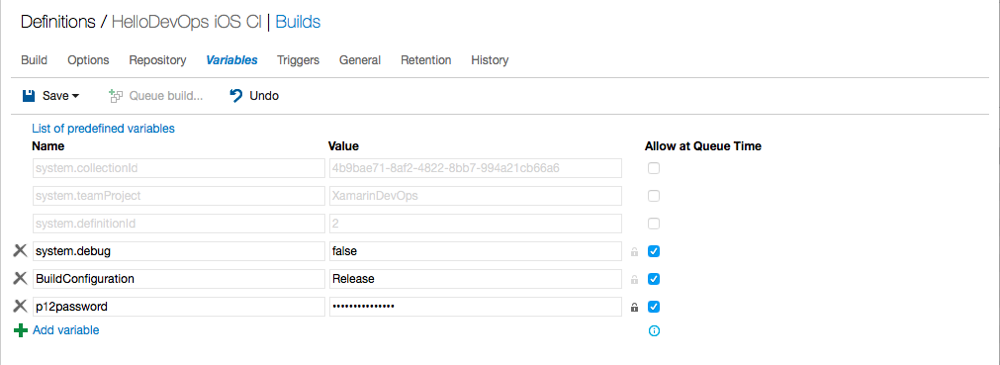
Next we want to add the P12 Certificate file password using a Secret variable to protect the password. Select the ‘Variables’ tab. Click the ‘+’ button to add a variable. Enter a name such as ‘p12password’ and the password itself. Now click the button with the padlock icon to hide the password and check the ‘Allow at Queue Time’ option.
Now select the ‘Build’ tab. Enter the variable we just created to the ‘P12 Password’, in this case ‘$(p12password):-
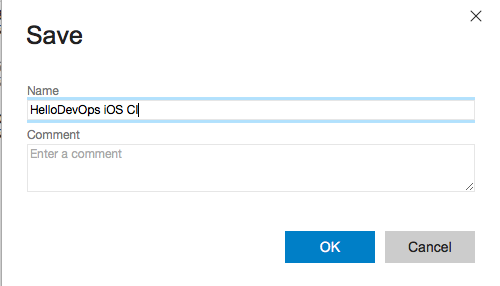
Click the ‘Save’ button and give the build a name:-
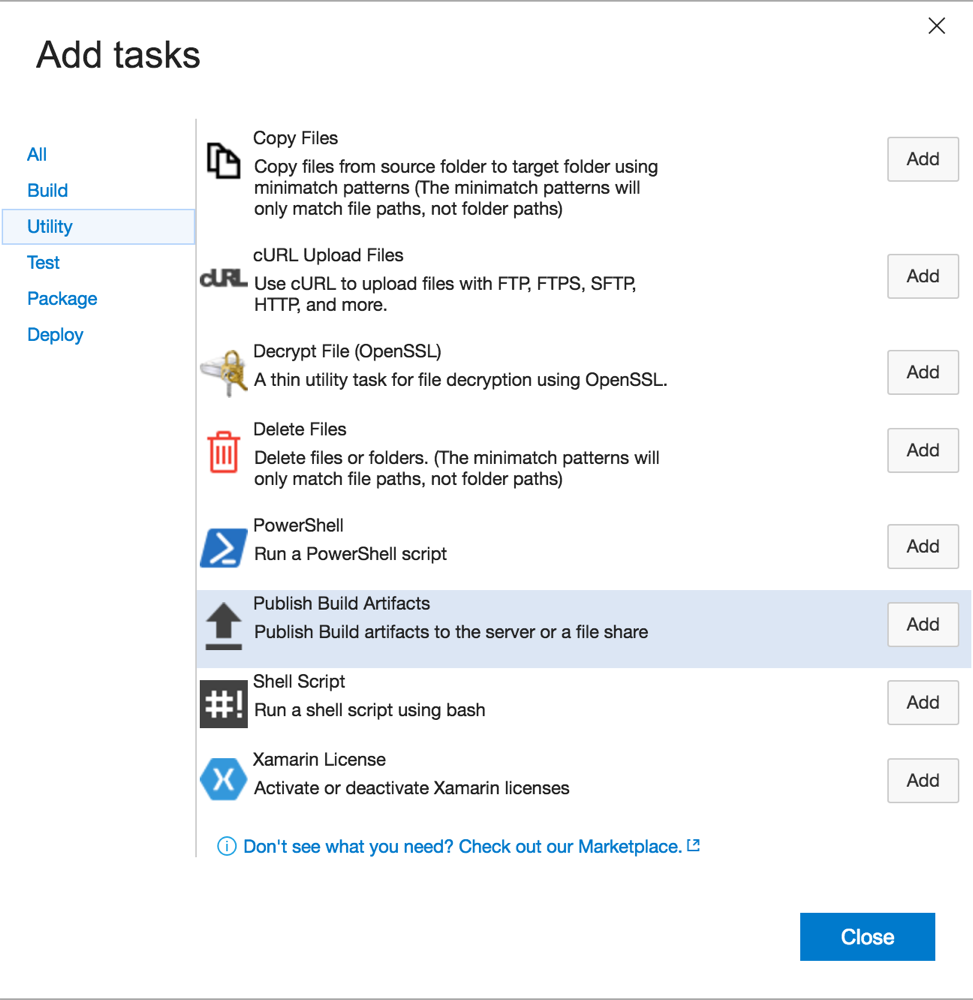
It's probably also worth adding a build step to restore the NuGet packages as most apps will be using NuGet packages. Click the '+ Add build step...' button. The 'Add tasks' dialog is displayed. Select the 'Package' category and then click the ‘Add’ button on the ‘NuGet Installer’ item:-
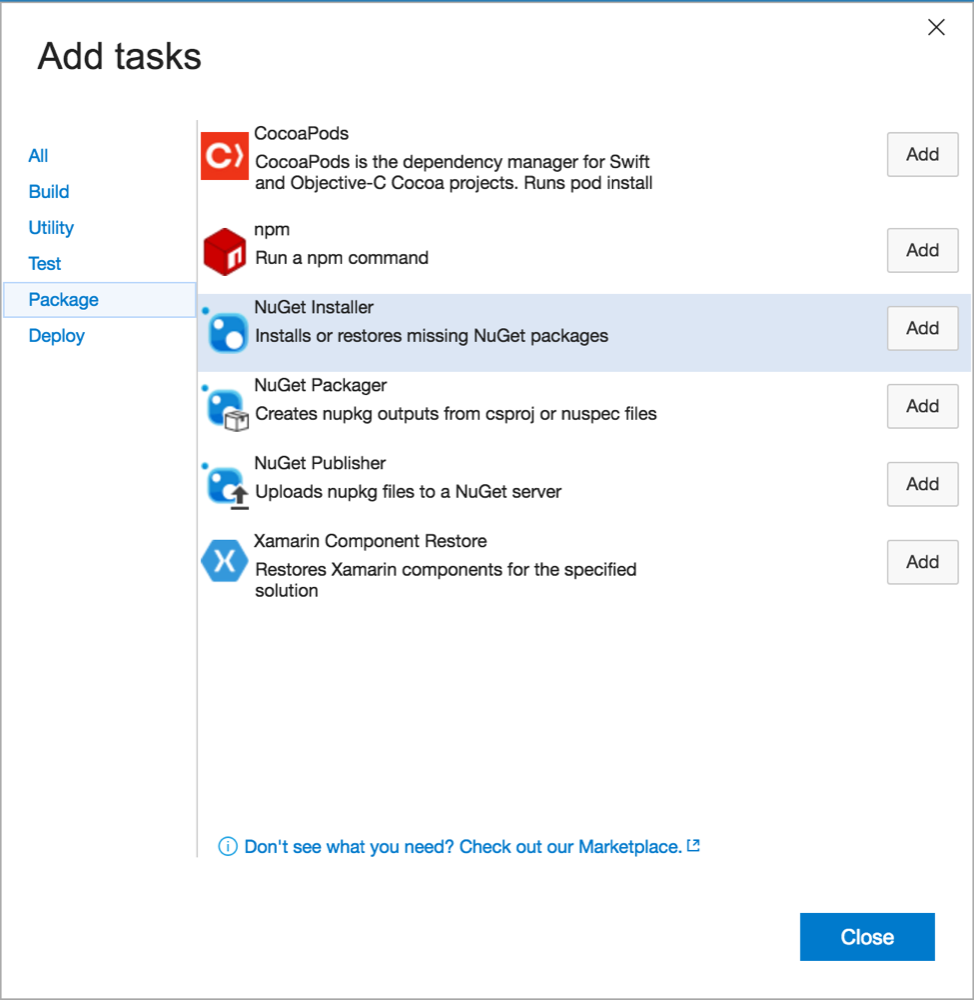
Drag the 'NuGet Installer' build step to the top of the list. The default values for the fields are fine.

Queue the build and it confirm that the ‘Queue’ option is set to ‘Default’:-
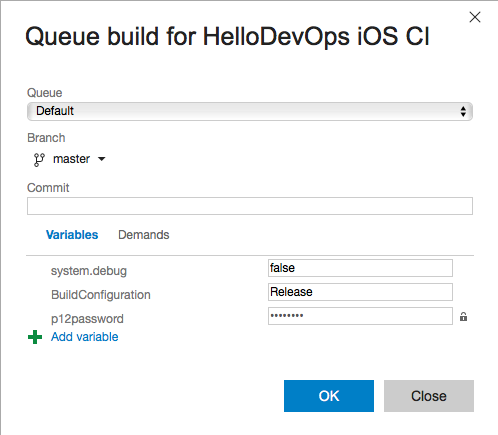
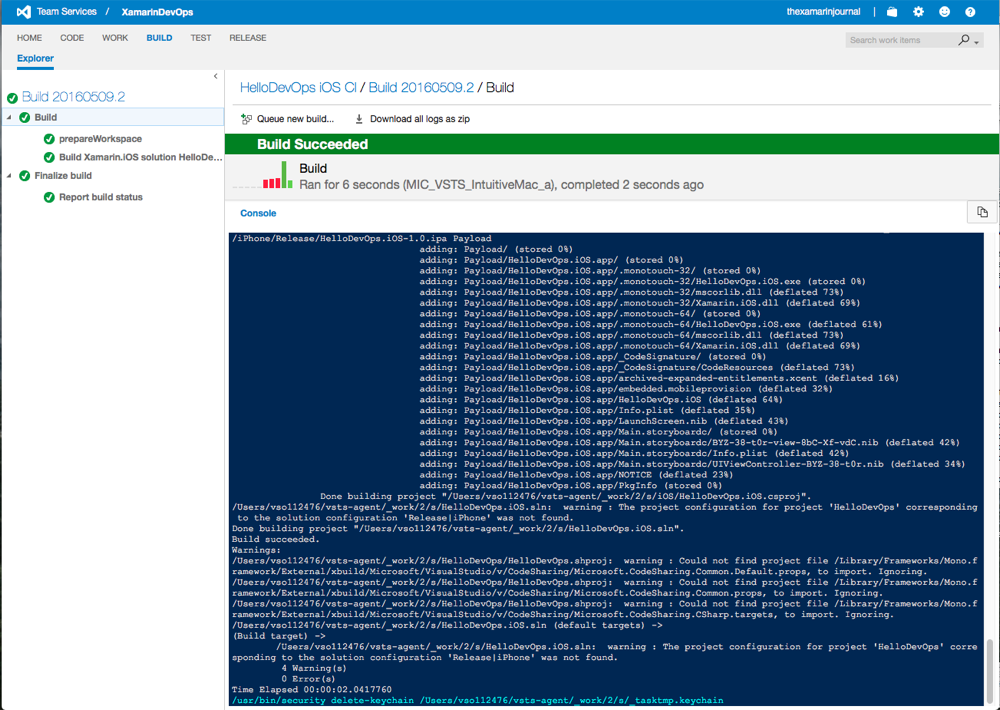
Click the ‘OK’ button and the build should be queued and the build output displayed:-
Publish The Build Artifacts
Now that the build is running ok we will need to copy and publish the build artifacts. I found the Microsoft documentation Build your Xamarin app useful.
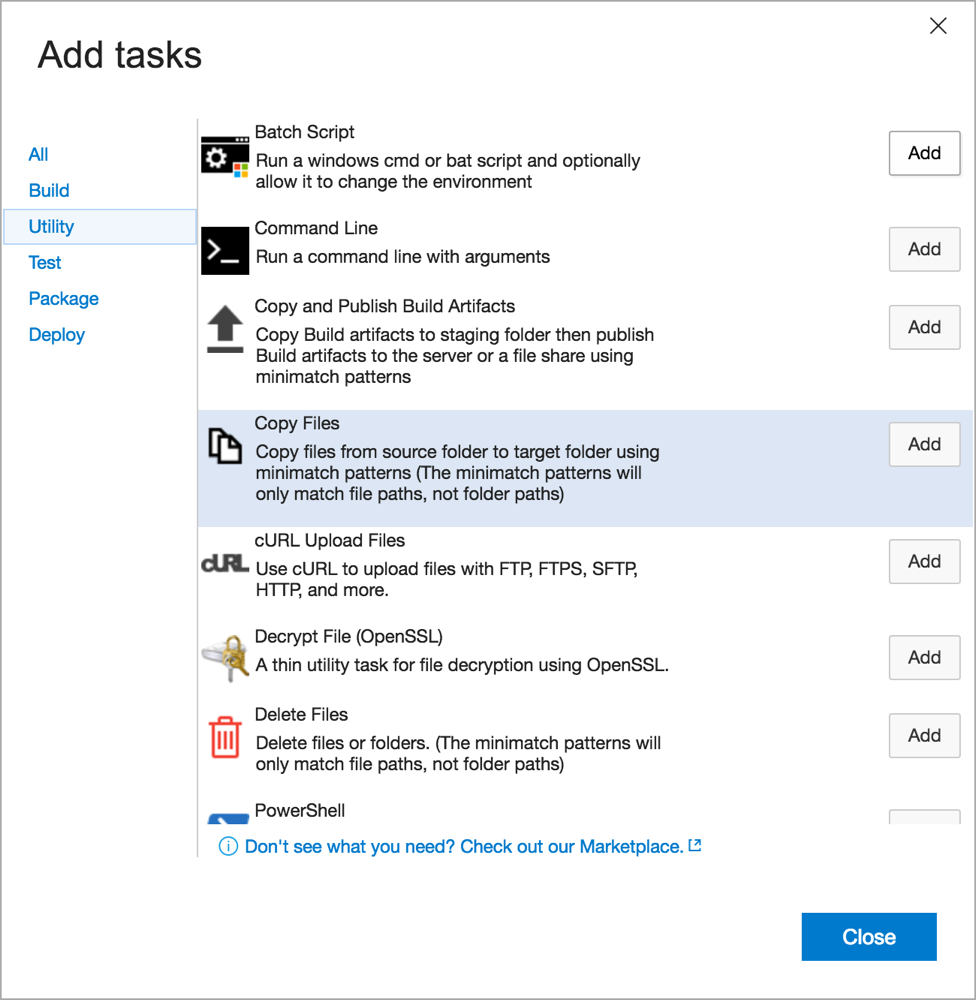
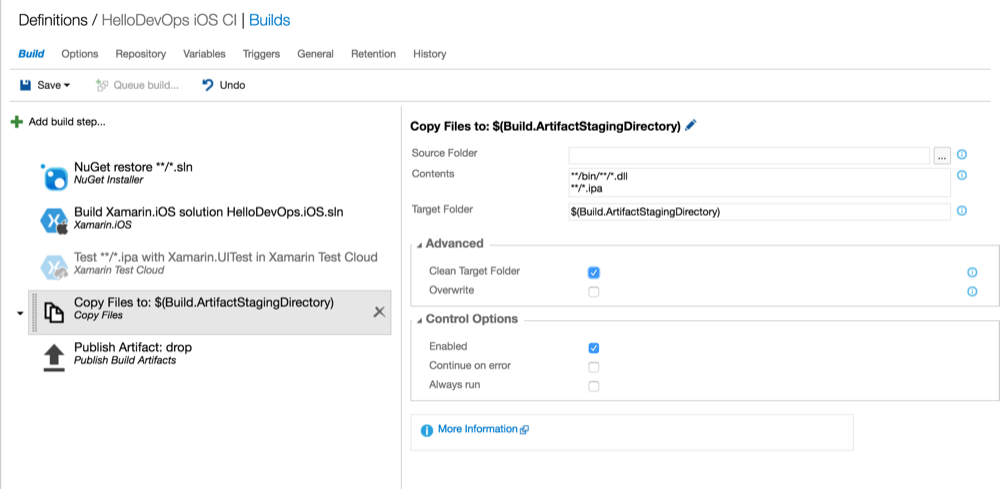
Edit the Build Definition by clicking on the build name and then the ‘Edit’ button. Now click the ‘Add build step…’ button. The ‘Add tasks’ dialog is displayed. Select the ‘Utility’ category and then click the ‘Add’ button on the ‘Copy Files’ item. Click the 'Close' button:-
Edit the Contents field to add
**/bin/**/*.dll
 **/*.ipa
Next set the ‘Target Folder’ value to $(Build.ArtifactStagingDirectory).
Expand the 'Advanced' section and check the 'Clean Target Folder' option.
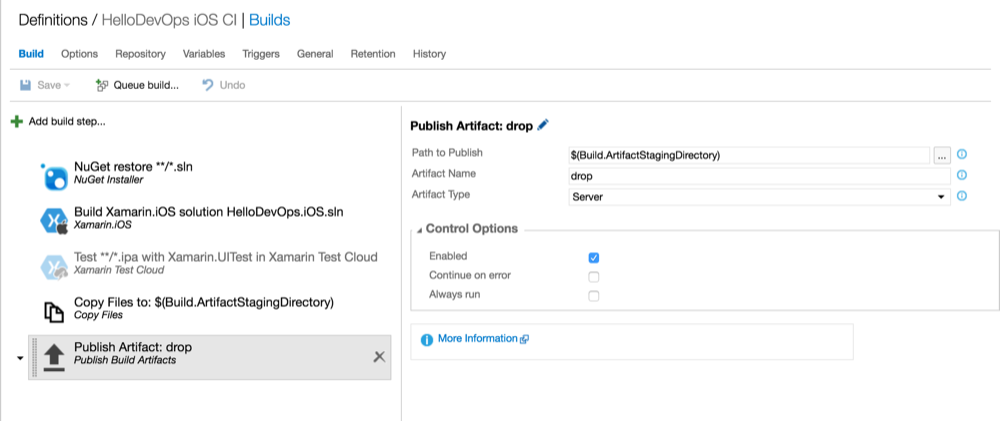
Edit the Build Definition by clicking on the build name and then the ‘Edit’ button. Now click the ‘Add build step…’ button. The ‘Add tasks’ dialog is displayed. Select the ‘Utility’ category and then click the ‘Add’ button on the ‘Publish Build Artifacts’ item. Click the 'Close' button:-
Edit the ‘Path to Publish’ field to $(Build.ArtifactStagingDirectory)
Edit the ‘Artifact Name’ field to drop
Edit the Artifact Type to Server.
The build results page should now have an ‘Artifacts’ tab which allows for the downloading of the build artifacts.
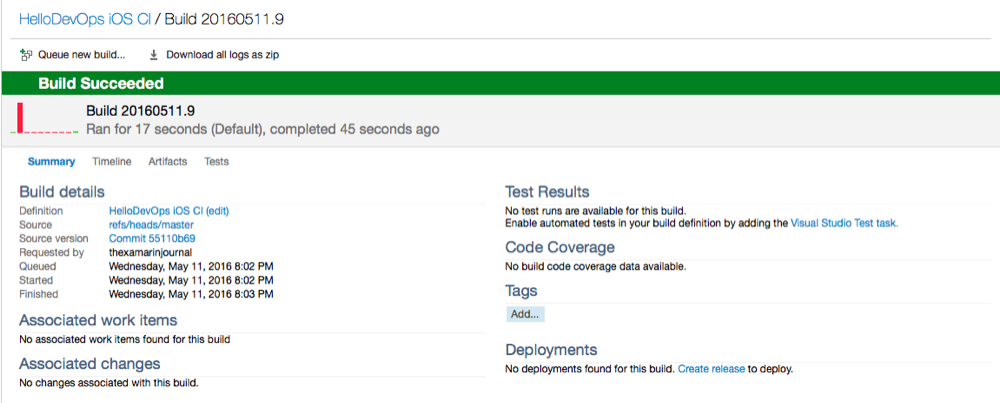
Click on the 'Download' link to download the zip file.
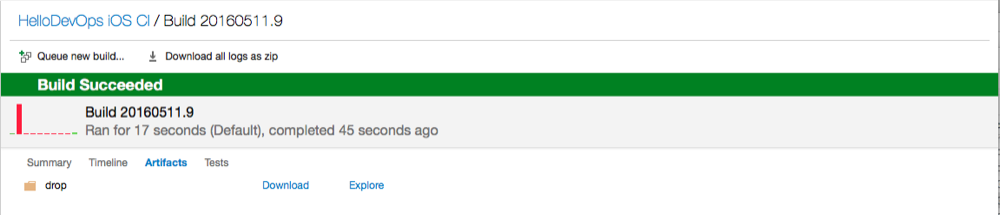
Using Finder we can open the zip folder and see that there is an .ipa file in the iOS\bin\Release folder.

Install The App On An iPhone
We can now install the application created by the CI build onto a device using iTunes.
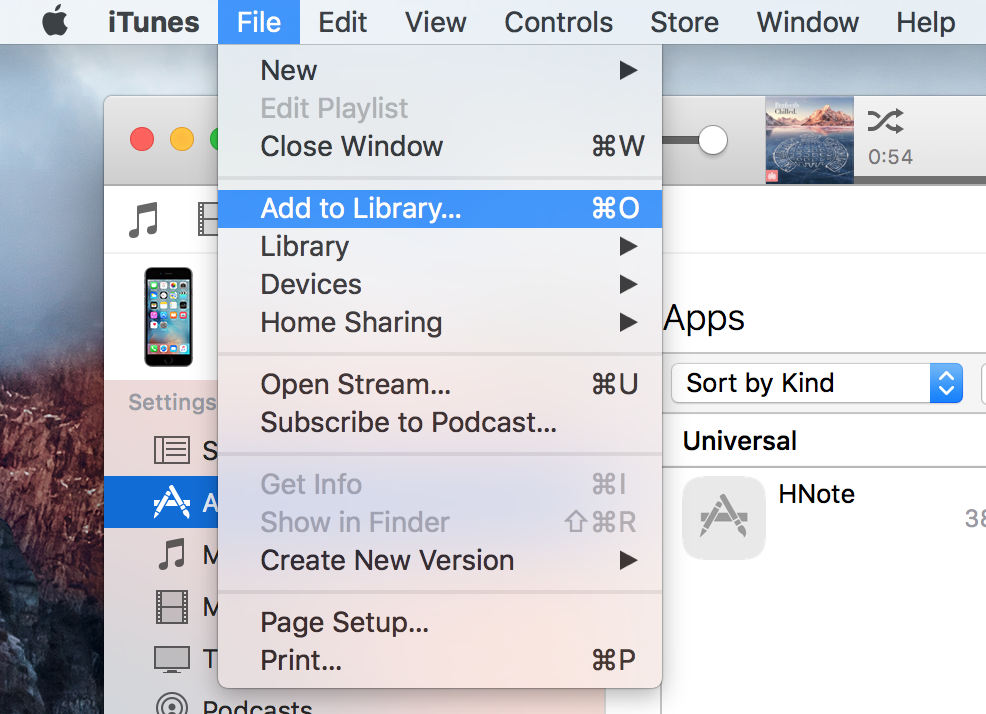
Ensure a device is connected and start iTunes. Click on the iPhone icon and then select the Apps category.
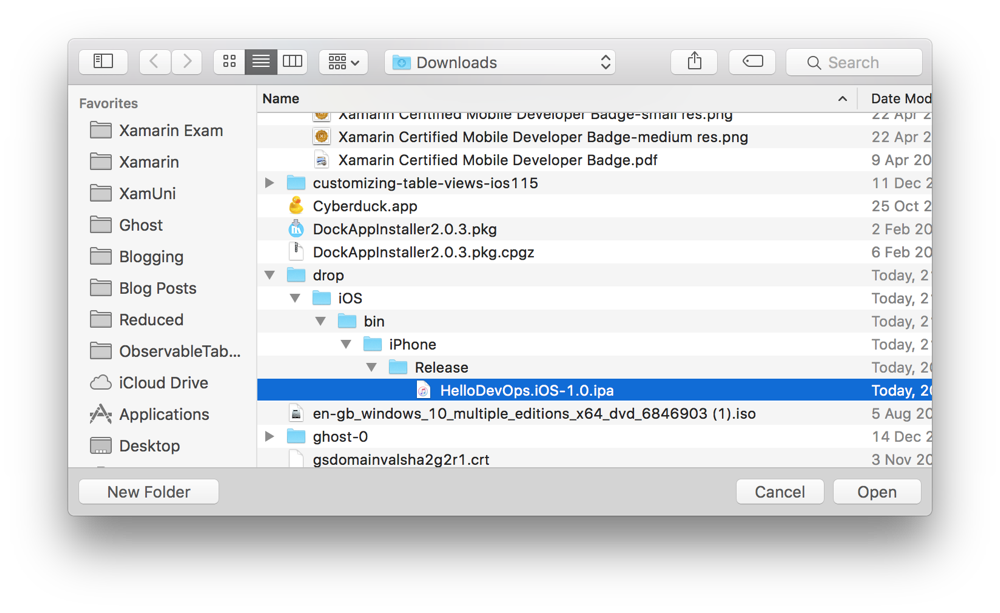
Next Select the ‘Add to Library..’ option on the ‘File’ menu and select the .ipa file.
Click the 'Open' button:-
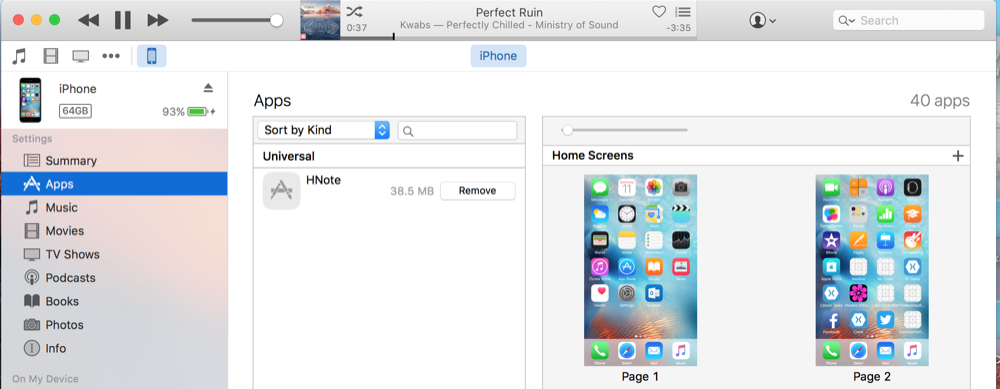
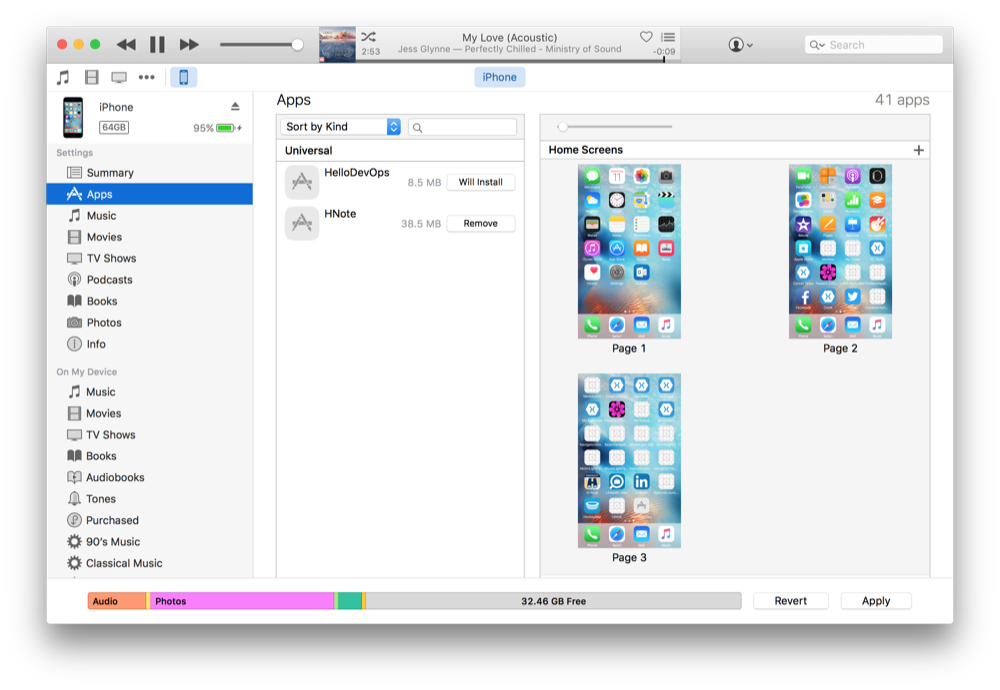
The HelloDevOps app is now listed in the Apps table:-

Click the ‘Install’ button on the HelloDevOps entry to install the app. The button text changes from 'Install' to 'Will Install'. And the 'Sync' button changes to 'Apply':-
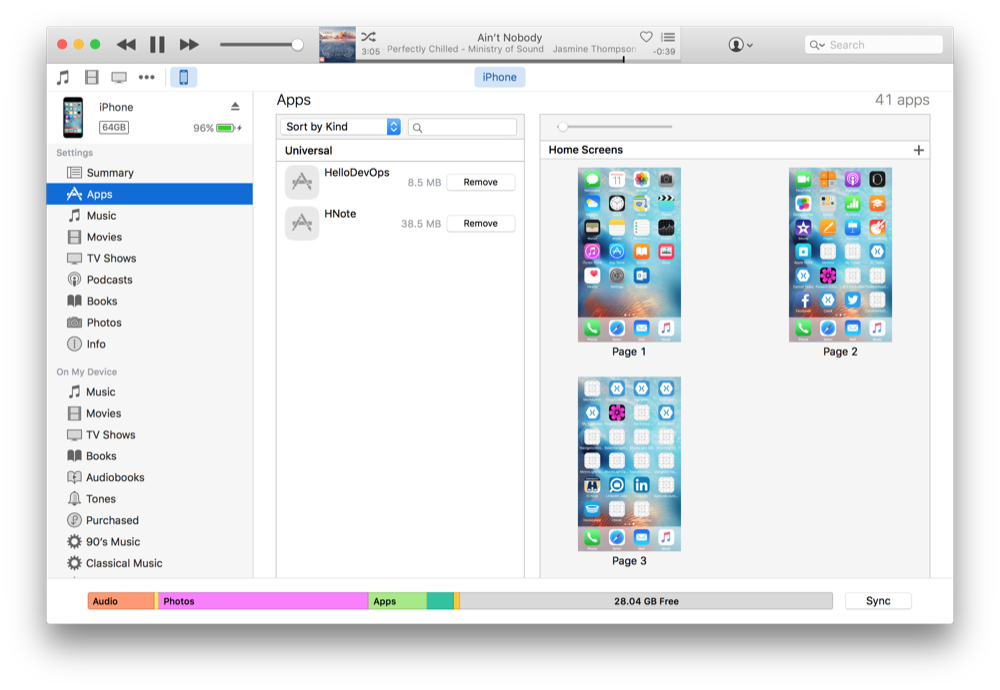
Click the 'Apply' button to install the app onto the iPhone. The HelloDevOps is now installed on the iPhone and the entry in the iTunes Apps table has a 'Remove' button:-
This should complete getting the iOS app setup for basic Continuous Integration builds in VSTS.
Adding a versioning build step, unit test and UI tests would be the obvious next steps to complete the Continuous Integration Builds before starting Continuous Deployment using HockeyApp.