This post covers using MVVM Light with Xamarin iOS TableViews. It is part of a series of posts investigating how to use the MVVM pattern on the Xamarin platforms using shared View Models/Models/Services.
The presentation of lists of data is very common so I thought this would be a natural next stop for my tour of MVVM Light.
MVVM Light's iOS implementation provides the ObservableTableViewController as a means of binding data stored in an ObservableCollection to an iOS TableView.
I found that for the basic scenario this works well but has limitations. The documentation and usage of this feature of MVVM Light is not very extensive and so I may have missed something. If this is the case and someone can provide further information I will update this post accordingly.
Update 9th July 2016:- A new release of MVVM Light version 5.3 provides a ObservableTableViewSource class for Xamarin.iOS. This class allows the UITableViewController to be used correctly and removes for the workaround solutions described in this post. Please see the post Using the ObservableTableViewSource in MVVM Light V5.3 with Xamarin.iOS
Resources
Laurent Bugnion mentions the ObservableTableViewController in his Xamarin University guest lecture titled ‘MvvM Light Toolkit with Xamarin’.
The MVVM Light source code contains the Flowers sample which demonstrates the ObservableTableviewController and it's Android equivalent ObservableAdapter.
Mark Allibone’s blog post MVVM Light binding to iOS UITableViews was useful in getting started. He doesn’t actually state it anywhere but he is using the ObservableTableViewController. He also has another relevant post C# code everywhere thanks to the Portable Class Library.
I found the Xamarin docs for Working with Tables and Cells useful.
I experienced a problem which only manifested itself when deploying to a real device in setting a command binding to a UIBarButtonItem which I solved by referring to Laurent’s Solving the “Event not found” issue in Xamarin #MVVMLight binding and commanding.
The Xamarin recipe Storyboard a TableView walks through creating TableViews using Storyboards.
Key Points
- Binding an iOS TableView to an ObservableCollection such that it automatically add and removes items from the list as the ObservableCollection is modified is straight forward. It requires essentially two lines of code to create the ObservableTableViewController and set the TableView and two methods:-
public override void ViewDidLoad()
{
  base.ViewDidLoad();

  tableViewController = Vm.TodoTasks.GetController(CreateTaskCell,
                                                   BindTaskCell);
  tableViewController.TableView = TasksTableView;
}

private void BindTaskCell(UITableViewCell cell,
                          TaskModel taskModel,
                          NSIndexPath path)
{
  cell.TextLabel.Text = taskModel.Name;
  cell.DetailTextLabel.Text = taskModel.Notes;
}

private UITableViewCell CreateTaskCell(NSString cellIdentifier)
{
  var cell = new UITableViewCell(UITableViewCellStyle.Subtitle, null);
  cell.TextLabel.TextColor = UIColor.FromRGB(55, 63, 255);
  cell.DetailTextLabel.LineBreakMode = UILineBreakMode.TailTruncation;

  return cell;
}
- I experienced problems when using the SetCommand binding on a real device where the same code deployed to the simulator worked fine. Running on a real device an ArgumentException Event not found for the ‘Clicked’ event was thrown when attempting to se the command via:-
AddTaskButton.SetCommand("Clicked", Vm.AddTaskCommand);
I found that the workaround documented by Laurent fixed this problem. I used the second option and added the code:-
AddTaskButton.Clicked += (sender, e) => {};
I wanted to implement swipe to delete on a table row but couldn’t find an easy way to do this with the current implementation of ObservableTableViewController. To implement this requires overriding the CommitEditingStyle and CanEditRow methods on the UITableViewSource. These are also provided on the UITableViewController which the ObservableTableViewController derives from. I experimented with deriving from the ObservableTableViewController but found this didn’t work and the methods were not called. I may have missed something, if so please contact me and I’ll update the post.
To implement the swipe to delete was in fact relatively straight forward, I copied the ObservableTableViewController and modified the ObservableTableSource class to be public and made some minor modifications to the ObservableTableViewController so support this, mainly changing some private members to protected and protected methods to public. I could then derive from the ObservableTableSource and implement the overrides of the CommitEditingStyle and CanEditRow methods and derive from ObservableTableViewController and override the CreateSource method to create the derived ObservableTableSource.
This is described in the post Digging Deeper into XamariniOS Table Views with MVVM Light.
The Example Step by Step
The example app presents a list of Tasks with notes in a TableView. Some example task data has been seeded. New Tasks can be added via the '+' button in the Navigation Bar.

The data is held in memory in an ObservableCollection in the TaskViewModel. Each task is represented by a TaskModel, see the class diagram below.

Create a new SingleView App named ObservableTables using a Shared Project.

Configure the project.

The resulting solution structure.

Add the MVMV Light Nuget package to the iOS project.

Add the MVMV Light Libs only Nuget package to the Android project.

Delete the MyClass.cs from the SharedProject.
Create a Models folder and add a new class named TaskModel to it.
Remove the declaration:-
using System;
Add the declaration:-
using GalaSoft.MvvmLight;
Edit the TaskModel class to add some properties to store the data:-
public class TaskModel :ObservableObject
{
  public TaskModel()
  {
  }

  public int ID { get; set; }
  public string Name { get; set; }
  public string Notes { get; set; }
  public bool Done { get; set; }
}
Move the ViewModel folder and the ViewModelLocator and MainViewModel classes contained therein to the SharedProject.
Edit the namespace declarations from ObservableTables.iOS.ViewModel to ObservableTables.ViewModel.
Rename the MainViewModel class to TaskListViewModel.
Change the using declarations in the TaskListViewModel to those below:-
public class TaskListViewModel : ViewModelBase
{

  public ObservableCollection<TaskModel> TodoTasks { get; private set; }

  public TaskListViewModel()
  {
    TodoTasks = new ObservableCollection<TaskModel>()
    {
      new TaskModel
      {
        Name = "Make Lunch",
        Notes = ""
      },
      new TaskModel
      {
        Name = "Pack Lunch",
        Notes = "In the bag, make sure we don't squash anything."
      },
      new TaskModel
      {
        Name = "Goto Work",
        Notes = "Walk if it's sunny"
      },
      new TaskModel
      {
        Name = "Eat Lunch",
        Notes = ""
      }
    };

    AddTaskCommand = new RelayCommand(AddTask);

  }

  public RelayCommand AddTaskCommand { get; set; }

  private void AddTask()
  {
    TodoTasks.Add(new TaskModel
                 {
                   Name = "New Task",
           Notes = ""
             });
    }
  }
}
Edit the ViewModelLocator using declarations to:-
using GalaSoft.MvvmLight.Ioc;
using Microsoft.Practices.ServiceLocation;
Edit the class to register the TaskListViewModel if the previous rename refactoring hasn’t already and change the property name from Main to TaskList:-
public class ViewModelLocator
{
  public ViewModelLocator()
  {
    ServiceLocator.SetLocatorProvider(() => SimpleIoc.Default);

    SimpleIoc.Default.Register<TaskListViewModel>();
  }

  public TaskListViewModel TaskList
  {
    get
    {
      return ServiceLocator.Current.GetInstance<TaskListViewModel>();
    }
  }

  public static void Cleanup()
  {
    // TODO Clear the ViewModels
  }
}
We will be using a NavigationBar to host the Add button so the next few steps will cover setting up the ViewControllers via the Storyboard.
Delete the existing ViewController class.
Open the Main.storyboard.

Select the existing View Controller using the black bar at the bottom and delete it.

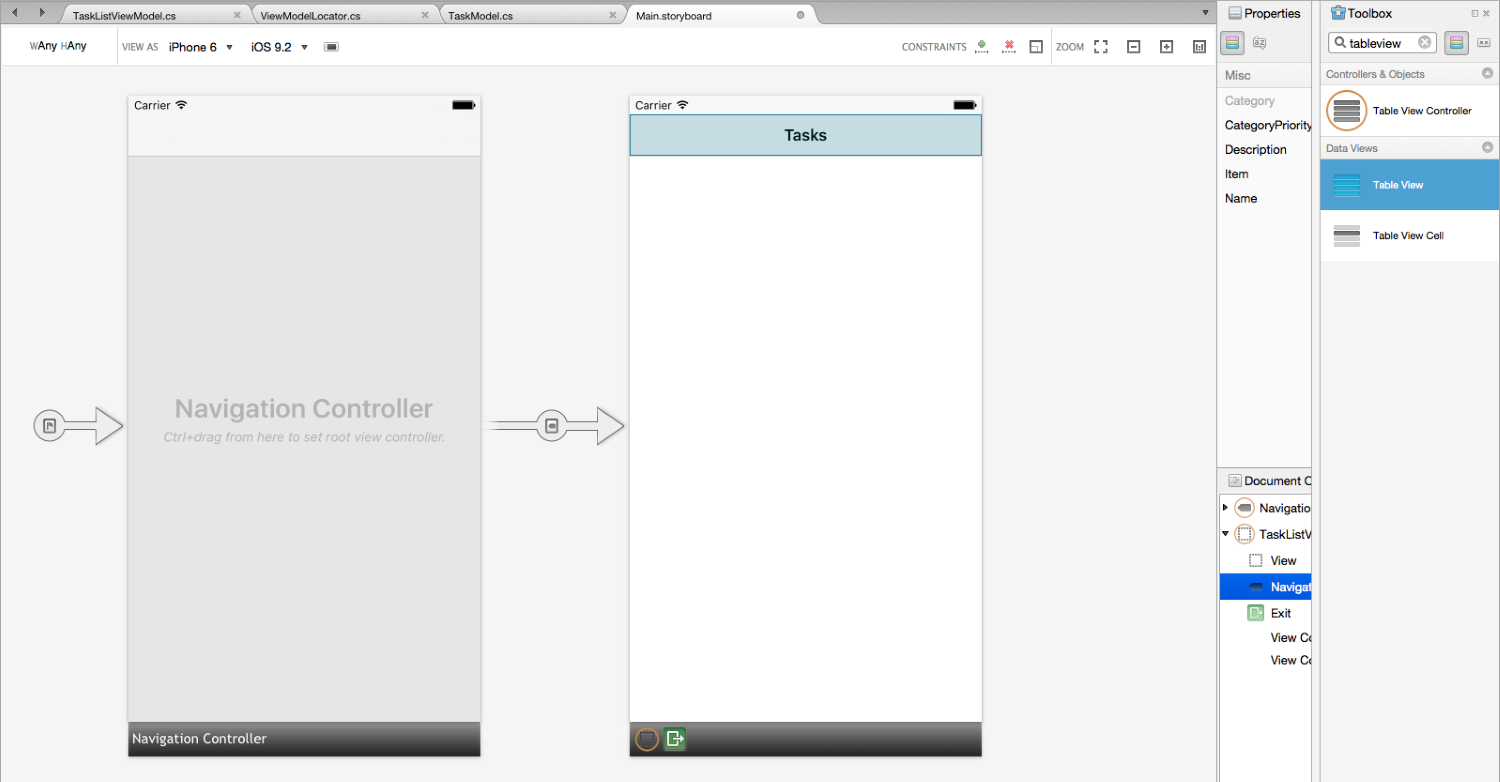
Select the Navigation Controller and drag it to the design surface

Select the View Controller using the black bar at the bottom and type the name TaskListViewController in the class name property and press return to create the new class.

Select the NavigationItem using the DocumentOutline and edit the Title property from ‘Root View Controller’ to ’Tasks’

Select the TableView in the Toolbox and drag it onto the TaskListViewController.
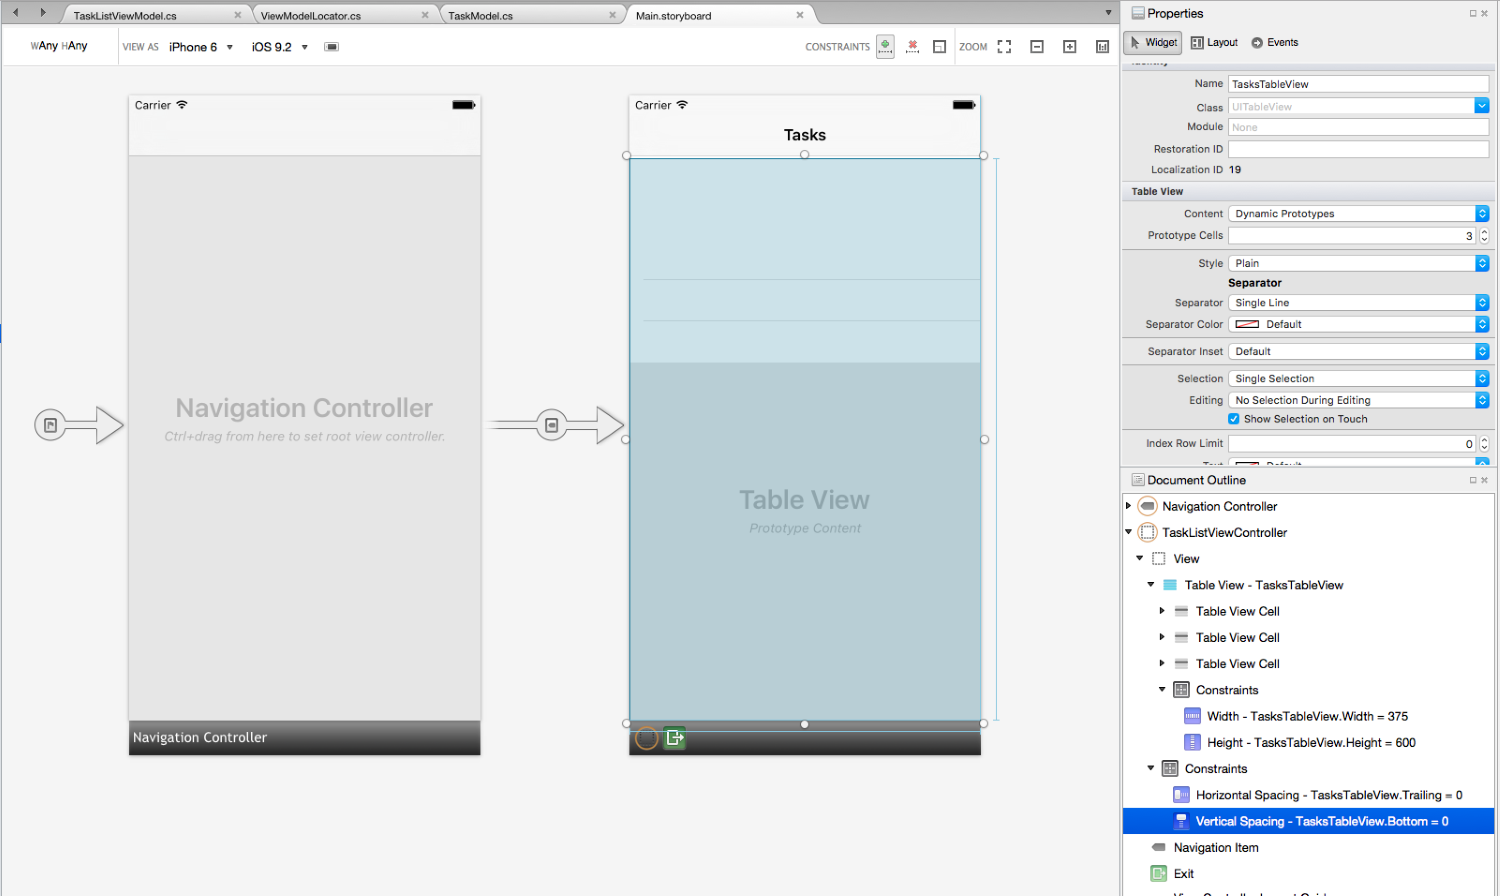
Select the TableView using the DocumentOutline and edit the Name property to TasksTableView

Resize the TableView.

With the TableView selected press the Add Recommended Constraints button (The Green plus icon)

The constraints added automatically:-
Edit the TaskListViewController :-
Edit the using declarations to:-
using Foundation;
using System;
using UIKit;
using GalaSoft.MvvmLight.Helpers;

using ObservableTables.ViewModel;
Edit the class to:-
partial class TaskListViewController : UIViewController
{
  private ObservableTableViewController<TaskModel> tableViewController;

  private TaskListViewModel Vm => Application.Locator.TaskList;

  public TaskListViewController(IntPtr handle) : base (handle)
  {
  }

  public UIBarButtonItem AddTaskButton
  {
    get;
    private set;
  }

  public override void ViewDidLoad()
  {
    base.ViewDidLoad();

    AddTaskButton = new UIBarButtonItem(UIBarButtonSystemItem.Add);
    this.NavigationItem.SetLeftBarButtonItem(AddTaskButton, false);

    //note this was needed when deploying to a real iPhone but worked
    //on the simulator without it.
    //The Argument Exception Event not found clicked was thrown
    AddTaskButton.Clicked += (sender, e) => {};

    AddTaskButton.SetCommand("Clicked", Vm.AddTaskCommand);

    tableViewController = Vm.TodoTasks
                          .GetController(CreateTaskCell, BindTaskCell);
    tableViewController.TableView = TasksTableView;
  }

  private void BindTaskCell(UITableViewCell cell,
                            TaskModel taskModel,
                            NSIndexPath path)
  {
    cell.TextLabel.Text = taskModel.Name;
    cell.DetailTextLabel.Text = taskModel.Notes;
  }

  private UITableViewCell CreateTaskCell(NSString cellIdentifier)
  {
    var cell = new UITableViewCell(UITableViewCellStyle.Subtitle, null);
    cell.TextLabel.TextColor = UIColor.FromRGB(55, 63, 255);
    cell.DetailTextLabel.LineBreakMode = UILineBreakMode.TailTruncation;

    return cell;
  }
}
Edit the Main class thus:-
using UIKit;
using ObservableTables.ViewModel;

namespace ObservableTables.iOS
{
  public class Application
  {
    private static ViewModelLocator locator;

    // This is the main entry point of the application.
    static void Main (string[] args)
    {
      // if you want to use a different Application Delegate class from "AppDelegate"
      // you can specify it here.
      UIApplication.Main (args, null, "AppDelegate");
    }

    public static ViewModelLocator Locator
    {
      get
      {
        return locator ?? (locator = new ViewModelLocator());
      }
    }
  }
}
And in the AppDelegate edit the FinishedLaunching method to add the initialisation of the Mvvm Light DispatcherHelper:-
public override bool FinishedLaunching(UIApplication application,
                                       NSDictionary launchOptions)
{
  // Override point for customization after application launch.
  // If not required for your application you can safely delete this method
  // MVVM Light's DispatcherHelper for cross-thread handling.
  DispatcherHelper.Initialize(application);

  return true;
}
The application should now run and we can add tasks be clicking on the ‘+’ button in the Navigation Bar. The complete example code can be found on GitHub.